
Oven cleaning with vinegar and baking soda – sounds like a science experiment gone right, doesn’t it? But trust me, it’s a game-changer for anyone who’s ever stared into the abyss of a greasy, burnt oven and shuddered. For generations, tackling oven grime has been a dreaded chore, often involving harsh chemicals and hours of scrubbing. But what if I told you there’s a natural, effective, and surprisingly simple way to restore your oven’s sparkle using ingredients you probably already have in your pantry?
This DIY oven cleaning trick isn’t just about elbow grease; it’s about embracing a more sustainable and healthier approach to home care. Think about it: our ovens are where we create delicious meals for our loved ones. Shouldn’t we be cleaning them with ingredients we feel good about? Plus, avoiding those harsh chemicals means a safer environment for you, your family, and even your furry friends.
In this article, I’m going to walk you through the step-by-step process of oven cleaning with vinegar and baking soda. I’ll share my tried-and-true tips and tricks to make the process as easy and efficient as possible. Get ready to say goodbye to stubborn stains and hello to a sparkling clean oven – naturally!
DIY Oven Cleaning with Vinegar and Baking Soda: A Sparkling Clean Oven the Natural Way
Okay, let’s face it, cleaning the oven is probably on everyone’s list of least favorite chores. But a sparkling clean oven makes cooking so much more enjoyable (and probably even helps your food cook more evenly!). Forget those harsh chemical cleaners – I’m going to show you how to get your oven looking brand new using just vinegar and baking soda. It’s a natural, effective, and budget-friendly method. Trust me, you’ll be amazed!
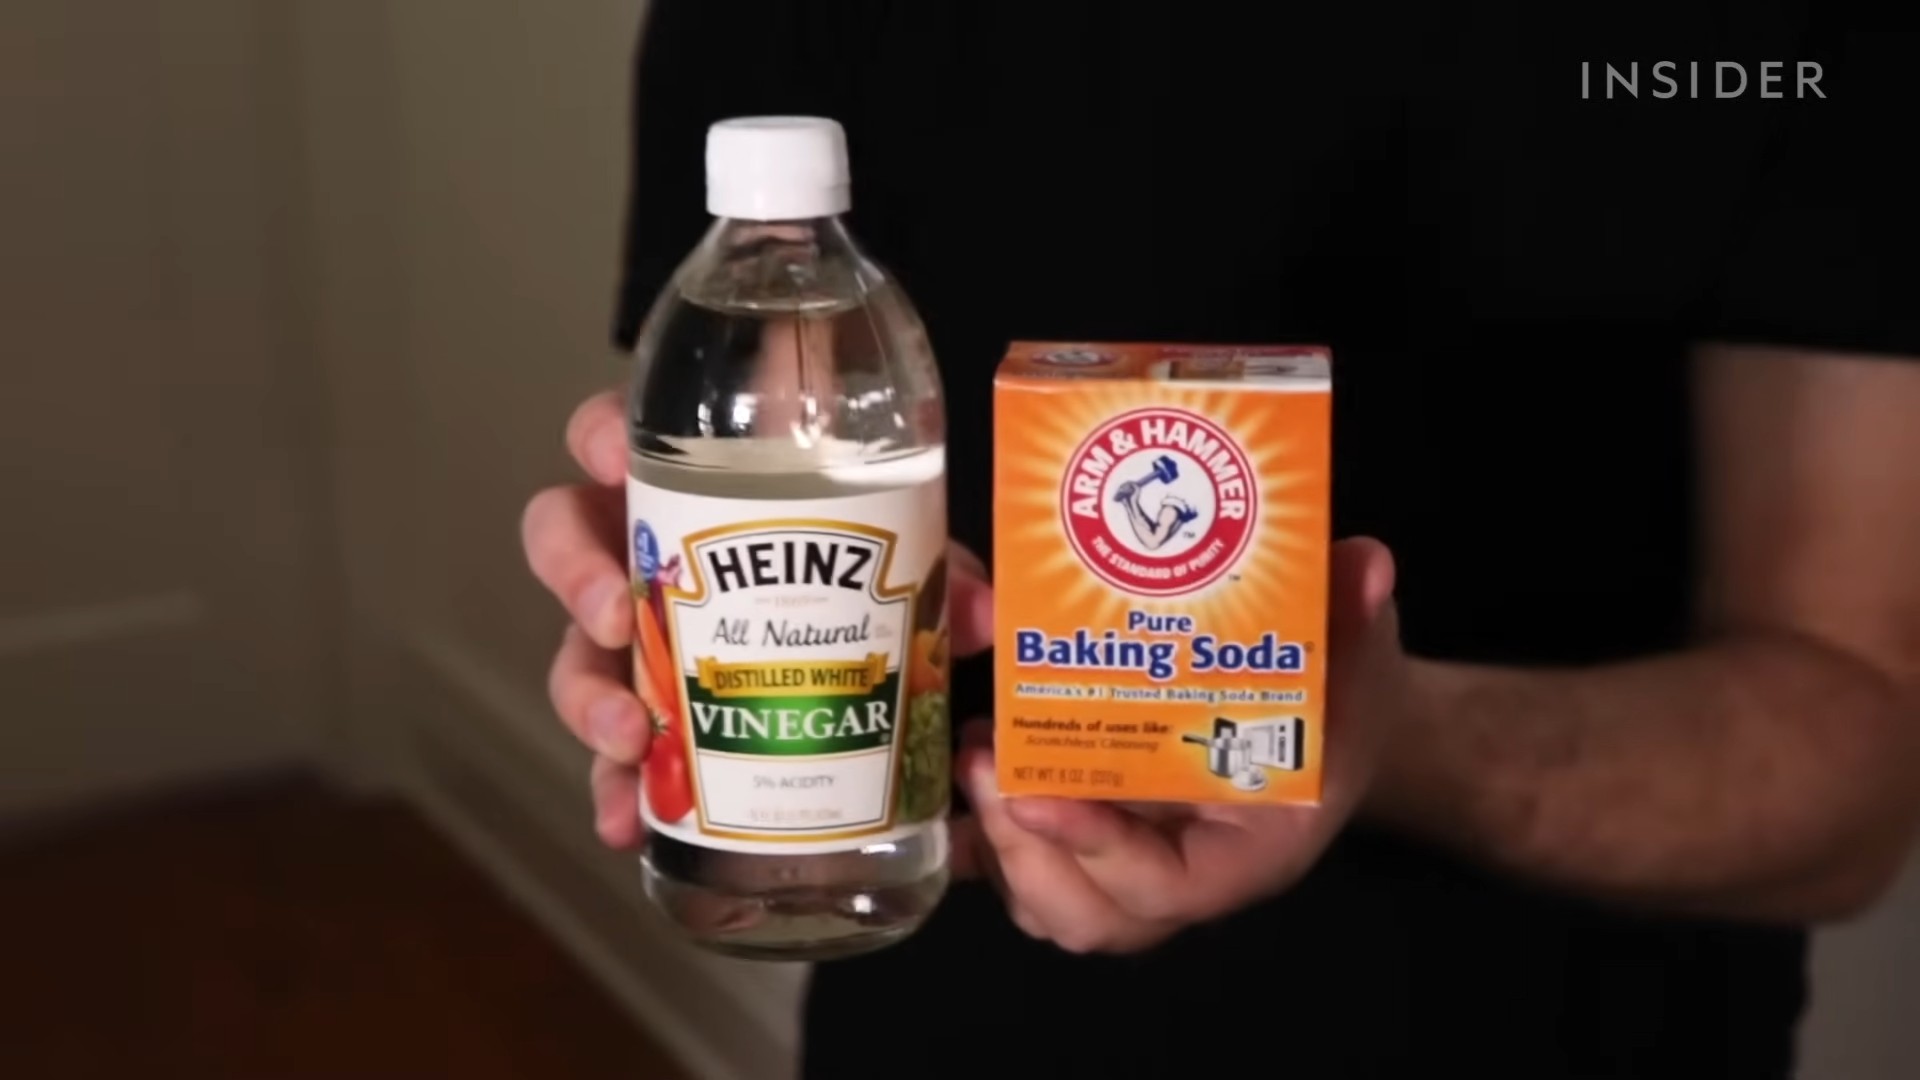
What You’ll Need:
* Baking Soda
* White Vinegar
* Water
* Spray Bottle
* Spatula or Scraper
* Rubber Gloves (optional, but recommended)
* Sponge or Cloth
* Old Towels or Rags
Getting Started: Preparing Your Oven
Before we dive into the cleaning process, let’s get the oven ready. This is a crucial step for making the whole process smoother.
1. Remove the Oven Racks: Take out all the oven racks, pizza stones, or anything else you have inside. We’ll clean these separately later.
2. Protect Your Floor: Lay down old towels or rags around the base of your oven. This will catch any drips and prevent a mess on your kitchen floor. Baking soda paste can be a bit messy, so this is a lifesaver!
3. Scrape Loose Debris: Use a spatula or scraper to remove any large chunks of burnt food or debris from the bottom and sides of the oven. The less there is to deal with later, the better.
Making the Baking Soda Paste: The Magic Ingredient
This is where the magic happens! The baking soda paste is what will loosen all that baked-on grime.
1. Mix Baking Soda and Water: In a bowl, mix 1/2 cup of baking soda with a few tablespoons of water. Add water gradually until you form a thick, spreadable paste. You want it to be like a frosting consistency – not too runny, not too dry.
2. Adjust Consistency: If the paste is too thick, add a little more water, a teaspoon at a time. If it’s too runny, add a bit more baking soda.
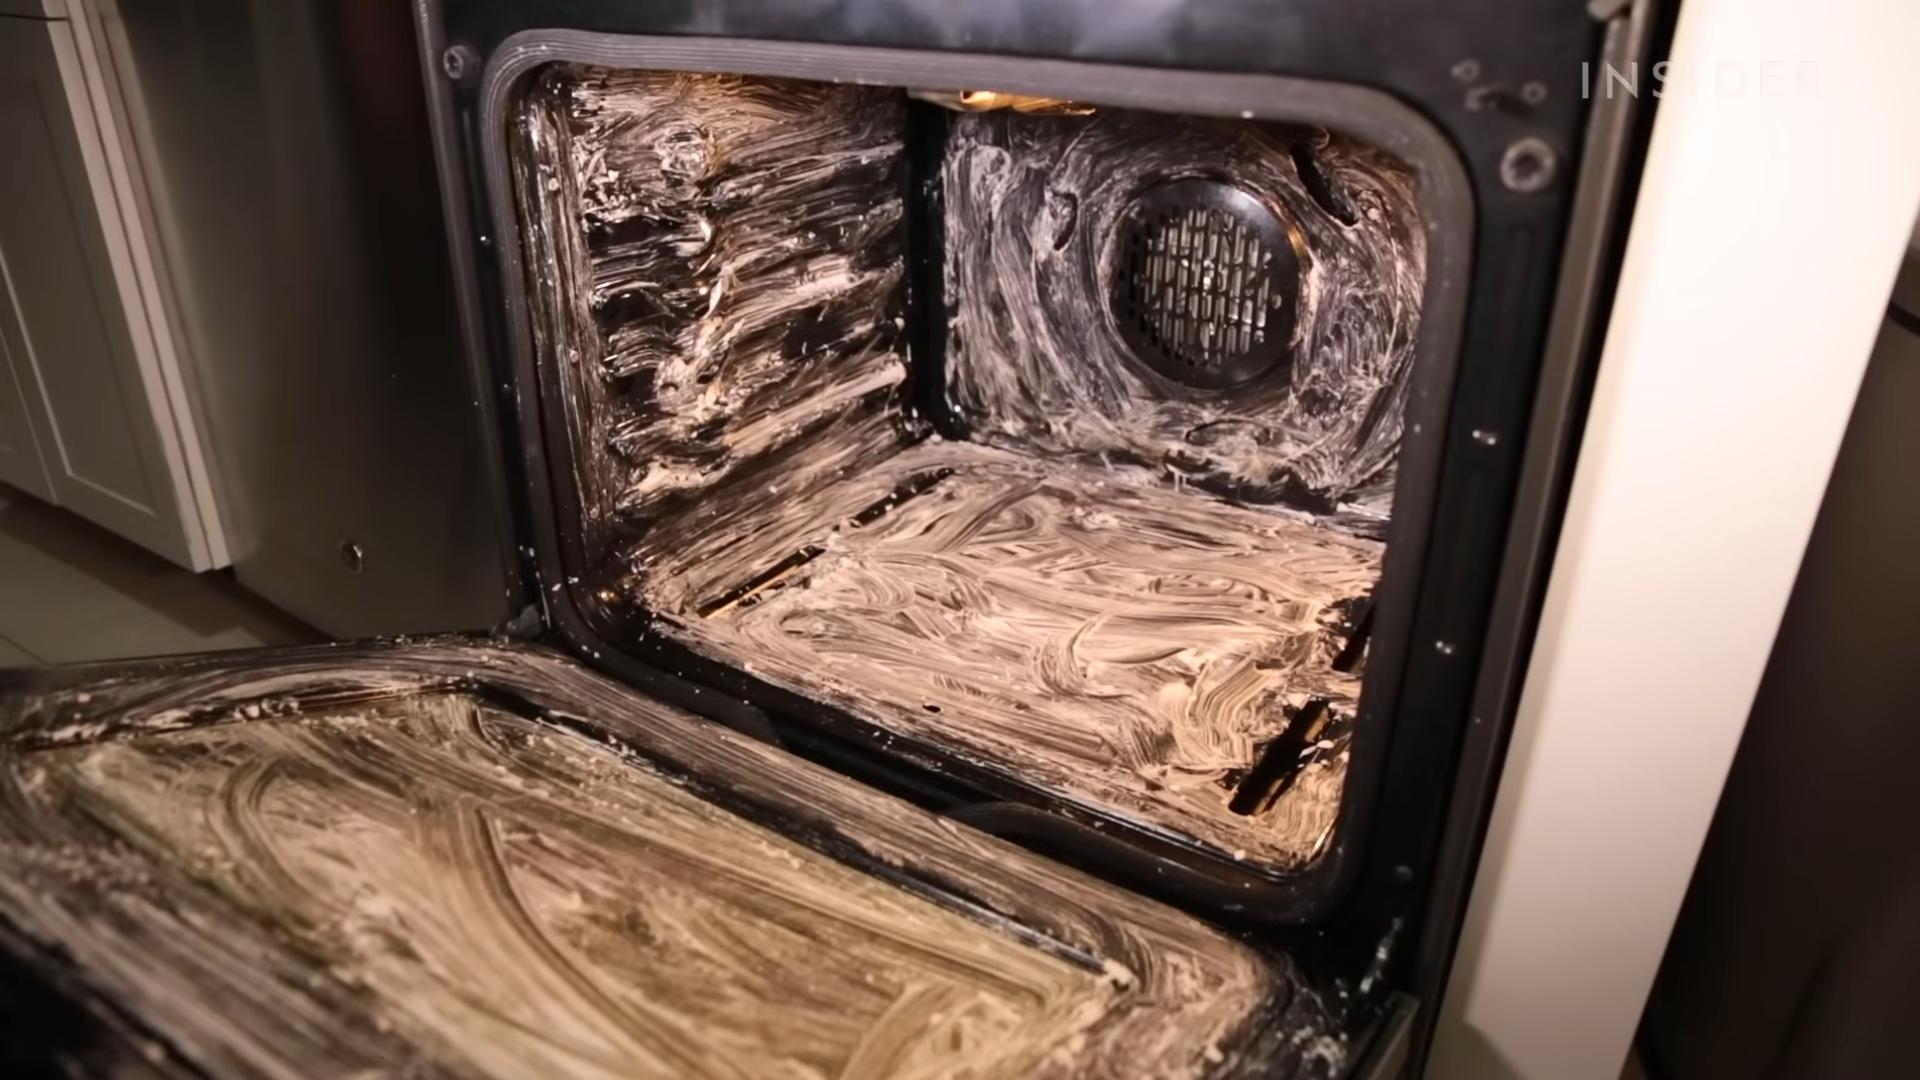
3. Apply the Paste: Using your hands (with gloves on, if you prefer), spread the baking soda paste all over the interior surfaces of your oven. This includes the back, sides, top, bottom, and even the door. Avoid the heating elements!
4. Thick Coverage is Key: Make sure you apply a thick, even layer. Don’t be shy! The thicker the layer, the better it will work at loosening the grime.
5. Pay Attention to Problem Areas: Focus on areas with heavy buildup. You can even apply a slightly thicker layer to these spots.
6. Let it Sit Overnight: This is the most important part! Let the baking soda paste sit for at least 12 hours, or even overnight. The longer it sits, the more effective it will be. This gives the baking soda time to work its magic and break down the grease and grime.
Cleaning the Oven Racks: A Soak and Scrub
While the baking soda is working its magic inside the oven, let’s tackle those racks.
1. Fill Your Sink or Tub: Fill your sink or bathtub with hot water. Make sure it’s hot enough to dissolve grease, but not so hot that you burn yourself.
2. Add Dish Soap and Baking Soda: Add a generous squirt of dish soap and about 1/2 cup of baking soda to the hot water. The dish soap will help cut through the grease, and the baking soda will add extra cleaning power.
3. Soak the Racks: Place the oven racks in the water and let them soak for at least 2-3 hours, or even overnight. The longer they soak, the easier they will be to clean.
4. Scrub the Racks: After soaking, use a scrub brush or sponge to scrub the racks. The grime should come off much easier now. For stubborn spots, you can use a paste of baking soda and water directly on the racks.
5. Rinse and Dry: Rinse the racks thoroughly with clean water and let them air dry completely before putting them back in the oven.
The Vinegar Rinse: The Final Touch
After the baking soda has done its job, it’s time for the vinegar rinse. This will help remove any remaining baking soda residue and leave your oven sparkling clean.
1. Fill a Spray Bottle with Vinegar: Pour white vinegar into a spray bottle. You can use it straight, no need to dilute it.
2. Spray the Oven Interior: Spray the entire interior of the oven with vinegar. You’ll notice the vinegar reacting with the baking soda, creating a bit of fizz. This is normal and helps to further loosen any remaining grime.
3. Wipe Down the Oven: Use a damp sponge or cloth to wipe down the entire interior of the oven. You may need to rinse the sponge or cloth frequently as you go.
4. Remove Stubborn Residue: If you encounter any stubborn residue, you can use a scraper or spatula to gently remove it. Be careful not to scratch the oven surface.
5. Rinse and Repeat: Rinse the oven with clean water and repeat the wiping process until all the baking soda and vinegar residue is gone.
6. Dry the Oven: Use a clean, dry towel to dry the interior of the oven. This will prevent water spots and leave it looking sparkling clean.
Reassembling and Final Touches: Almost There!
We’re in the home stretch! Just a few more steps and you’ll have a beautifully clean oven.
1. Replace the Oven Racks: Once the oven and racks are completely dry, replace the oven racks.
2. Wipe Down the Oven Door: Don’t forget to wipe down the outside of the oven door with a damp cloth and a mild cleaner.
3. Run a Low-Temperature Cycle (Optional): If you want to be extra sure that all the vinegar and baking soda residue is gone, you can run the oven on a low-temperature cycle (around 200 degrees Fahrenheit) for about 15-20 minutes. This will help to evaporate any remaining moisture.
4. Enjoy Your Clean Oven! Step back and admire your sparkling clean oven! You did it!
Tips and Tricks for a Super Clean Oven:
* Regular Cleaning is Key: The more often you clean your oven, the easier it will be to maintain. Try to clean it every few months, or even more frequently if you use it a lot.
* Spot Clean Spills Immediately: If you spill something in the oven, clean it up immediately. This will prevent it from baking on and becoming difficult to remove later.
* Use Oven Liners: Consider using oven liners to catch drips and spills. This will make cleaning much easier.
* Don’t Forget the Self-Cleaning Cycle (Use Sparingly): While this method is great, some ovens have a self-cleaning cycle. Use it sparingly, as it can be harsh on your oven.
* Ventilate Your Kitchen: Open windows or turn on your kitchen fan while cleaning your oven to ventilate the area.
* Be Patient: This method requires some patience, but the results are worth it! Don’t rush the process, and let the baking soda and vinegar do their job.
* For Extra Stubborn Stains: If you have extra stubborn stains, you can try making a paste of baking soda, salt, and water. Apply it to the stains and let it sit for a few hours before scrubbing.
And there you have it! A sparkling clean oven without the harsh chemicals. I hope you found this guide helpful. Happy cleaning!
Conclusion
So, there you have it! This simple yet incredibly effective DIY oven cleaning trick using vinegar and baking soda is a game-changer for anyone who dreads tackling that baked-on grime. Forget harsh chemicals, overpowering fumes, and hours of scrubbing. This method harnesses the natural power of readily available ingredients to deliver sparkling results.
Why is this a must-try? Because it’s not just about cleaning; it’s about reclaiming your time and peace of mind. Imagine effortlessly wiping away stubborn stains that once seemed impossible to remove. Think of the satisfaction of opening your oven to a pristine interior, ready to bake your next culinary masterpiece. This isn’t just about a clean oven; it’s about a cleaner, healthier kitchen environment for you and your family.
But the beauty of this DIY oven cleaning method lies in its adaptability. Feel free to experiment with variations to suit your specific needs and preferences. For instance, if you have particularly stubborn stains, you can let the baking soda paste sit overnight for maximum impact. You can also add a few drops of your favorite essential oil, like lemon or lavender, to the vinegar solution for a subtle, refreshing scent. If you find the paste a bit too thick, add a touch more water to achieve your desired consistency. Some people even prefer to use a spray bottle to apply the vinegar solution, ensuring even coverage.
Don’t be afraid to personalize this method to make it your own!
We’ve found that using a non-scratch scouring pad can be particularly helpful for loosening tough residue without damaging the oven’s surface. Remember to always test any cleaning method on a small, inconspicuous area first to ensure compatibility.
Ultimately, the goal is to find a cleaning routine that works for you and keeps your oven in tip-top shape. Regular maintenance, even a quick wipe-down after each use, can significantly reduce the build-up of grime and make future cleanings even easier.
We are confident that once you try this DIY oven cleaning method using vinegar and baking soda, you’ll be amazed by the results. It’s economical, eco-friendly, and incredibly effective.
We wholeheartedly encourage you to give it a try!
And most importantly, we want to hear about your experience! Did you find this method helpful? Did you discover any variations that worked particularly well for you? Share your tips, tricks, and before-and-after photos in the comments below. Let’s create a community of clean oven enthusiasts and help each other conquer the dreaded oven cleaning chore once and for all! Your feedback is invaluable and will help us refine and improve this guide for future readers. Let us know if you have any questions, and we’ll do our best to answer them. Happy cleaning!
Frequently Asked Questions (FAQs)
1. Is using vinegar and baking soda to clean my oven safe?
Yes, absolutely! Vinegar and baking soda are both natural, non-toxic ingredients, making them a safe alternative to harsh chemical oven cleaners. They are generally considered safe for use around food and pets, although it’s always a good idea to ensure the oven is thoroughly rinsed and dried before using it for cooking. Unlike many commercial oven cleaners, you won’t have to worry about breathing in harmful fumes or exposing your skin to corrosive chemicals. However, as with any cleaning product, it’s advisable to wear gloves to protect your hands, especially if you have sensitive skin. Also, avoid getting the mixture in your eyes. If contact occurs, rinse thoroughly with water.
2. Can I use this method on a self-cleaning oven?
While this method is generally safe for most ovens, it’s always best to consult your oven’s manufacturer’s instructions before using any cleaning method, especially on a self-cleaning oven. Some manufacturers advise against using any cleaning products, including natural ones, during the self-cleaning cycle. Using vinegar and baking soda might interfere with the self-cleaning function or potentially damage the oven’s interior coating. If you choose to use this method on a self-cleaning oven, do so with caution and always test it on a small, inconspicuous area first. If you’re unsure, it’s best to stick to the manufacturer’s recommended cleaning procedures.
3. How long should I leave the baking soda paste on the oven?
The duration depends on the severity of the grime. For lightly soiled ovens, 3-4 hours might suffice. However, for ovens with heavy build-up, leaving the paste on overnight (8-12 hours) is highly recommended. The longer the paste sits, the more time it has to loosen the baked-on grease and food particles, making them easier to wipe away. Just be sure to keep the paste moist by spritzing it with water occasionally if it starts to dry out.
4. What if the vinegar and baking soda mixture doesn’t remove all the grime?
Don’t worry; stubborn stains sometimes require a little extra effort. If the initial application doesn’t remove all the grime, try the following:
* **Reapply the paste:** Apply a fresh layer of baking soda paste to the affected areas and let it sit for a longer period.
* **Use a non-scratch scouring pad:** Gently scrub the stubborn stains with a non-scratch scouring pad or sponge. Avoid using abrasive materials that could damage the oven’s surface.
* **Repeat the process:** You may need to repeat the entire process a few times for heavily soiled ovens.
* **Try a razor scraper (with extreme caution):** For truly stubborn, baked-on messes on glass surfaces only, you can carefully use a razor scraper held at a shallow angle. Be extremely cautious to avoid scratching the glass.
5. My oven has a strong odor after cleaning. How do I get rid of it?
A lingering odor after cleaning is usually due to residual vinegar or baking soda. To eliminate the odor, try the following:
* **Thoroughly rinse the oven:** Make sure to rinse the oven thoroughly with clean water to remove any remaining traces of vinegar and baking soda.
* **Wipe with a damp cloth:** Wipe down all surfaces with a clean, damp cloth.
* **Air out the oven:** Leave the oven door open for several hours to allow it to air out completely.
* **Bake lemon slices:** Bake a few lemon slices in the oven at a low temperature (around 200°F or 93°C) for about an hour. The lemon will help absorb any lingering odors.
* **Place a bowl of baking soda:** Place a bowl of baking soda inside the oven overnight to absorb any remaining odors.
6. Can I use this method to clean my oven racks?
Yes, you can definitely use this method to clean your oven racks! In fact, it’s a very effective way to remove baked-on grease and grime. Here’s how:
* **Soak the racks:** Fill a bathtub or large sink with hot water and add about 1 cup of baking soda and 1/2 cup of vinegar.
* **Submerge the racks:** Submerge the oven racks in the water and let them soak for several hours or overnight.
* **Scrub the racks:** After soaking, scrub the racks with a brush or sponge to remove any remaining grime.
* **Rinse and dry:** Rinse the racks thoroughly with clean water and dry them completely before placing them back in the oven.
7. How often should I clean my oven using this method?
The frequency of cleaning depends on how often you use your oven and how much food spills inside. As a general guideline, cleaning your oven every 3-6 months is a good practice. However, if you notice significant build-up of grease and grime, you may need to clean it more frequently. Regular spot cleaning after spills can also help prevent the build-up of stubborn stains and make future cleanings easier.
8. Can I use this method on other appliances besides my oven?
While this method is primarily designed for oven cleaning, it can also be used to clean other appliances with baked-on grease and grime, such as stovetops, grills, and even some cookware. However, it’s essential to test the method on a small, inconspicuous area first to ensure it doesn’t damage the surface. Avoid using this method on delicate or sensitive surfaces, such as aluminum or copper.
9. What type of vinegar should I use?
White distilled vinegar is the best choice for cleaning purposes. It’s inexpensive, readily available, and has a high acidity level, making it effective at dissolving grease and grime. Avoid using other types of vinegar, such as apple cider vinegar or balsamic vinegar, as they may contain sugars or other additives that could leave a sticky residue.
10. Is there anything I should avoid cleaning with vinegar and baking soda?
While vinegar and baking soda are generally safe for most surfaces, there are a few things you should avoid cleaning with them:
* **Aluminum:** Vinegar can react with aluminum, causing it to corrode or discolor.
* **Cast iron:** Vinegar can strip the seasoning from cast iron cookware.
* **Waxed wood:** Vinegar can damage the finish on waxed wood surfaces.
* **Natural stone:** Vinegar can etch or damage natural stone surfaces, such as marble or granite.
* **Electronics:** Avoid using vinegar and baking soda to clean electronic devices, as the moisture can damage the internal components


Leave a Comment