
Mushroom Growing Plastic Bottle: Unlock the secrets to cultivating your own delicious and nutritious mushrooms right at home, using something you probably already have – a plastic bottle!
For centuries, mushroom cultivation has been shrouded in mystery, often associated with ancient traditions and specialized knowledge. From the shiitake logs of East Asia to the truffle hunts of Europe, the allure of these fungi has captivated cultures worldwide. But what if I told you that you could bypass the complex setups and expensive equipment and embark on your own mushroom-growing adventure with a simple, recycled plastic bottle?
In today’s world, where sustainability and self-sufficiency are more important than ever, learning how to grow your own food is a game-changer. Imagine the satisfaction of harvesting fresh, organic mushrooms grown with your own two hands! This DIY project isn’t just about saving money; it’s about connecting with nature, reducing waste, and enjoying the incredible flavor and health benefits of homegrown mushrooms. Plus, it’s a fantastic conversation starter!
This article will guide you through the entire process of mushroom growing plastic bottle method, from preparing your substrate to harvesting your first crop. We’ll break down each step into easy-to-follow instructions, ensuring that even beginners can experience the joy of cultivating their own fungi. So, grab a plastic bottle, and let’s get growing!
DIY Mushroom Growing in a Plastic Bottle: A Beginner’s Guide
Hey there, fellow fungi enthusiasts! Ever dreamt of harvesting your own delicious mushrooms right from your kitchen counter? Well, you’re in luck! This guide will walk you through a simple and rewarding DIY project: growing mushrooms in a recycled plastic bottle. It’s a fantastic way to reuse materials, learn about mycology, and enjoy fresh, homegrown goodness. Let’s get started!
What You’ll Need
Before we dive in, let’s gather our supplies. Don’t worry, most of these are easily accessible and budget-friendly.
* A Clean Plastic Bottle (2-Liter or Larger): Think soda bottles, juice bottles – anything clear and sturdy will work. Make sure it’s thoroughly cleaned and sanitized to prevent contamination.
* Mushroom Spawn: This is the “seed” of your mushrooms. Oyster mushrooms are a great choice for beginners as they are relatively easy to grow and tolerate a wider range of conditions. You can find spawn online or at local gardening centers.
* Substrate: This is the food source for your mushrooms. Straw, coffee grounds, and cardboard are all excellent options. We’ll be using straw in this guide, as it’s readily available and provides good aeration.
* Spray Bottle with Water: For maintaining humidity. Distilled or filtered water is preferred to avoid introducing unwanted minerals.
* Rubbing Alcohol: For sanitizing your work area and tools.
* Gloves: To keep things sterile and prevent contamination.
* Knife or Scissors: For cutting the bottle and straw. Make sure they are clean and sanitized.
* Microwave-Safe Bowl or Pot: For pasteurizing the straw.
* Microwave or Stove: For pasteurizing the straw.
* Optional: Micropore Tape: To cover the ventilation holes, allowing air exchange while preventing contaminants from entering.
* Optional: Vermiculite: To help retain moisture in the substrate.
Preparing the Substrate (Straw)
The substrate needs to be pasteurized to kill off any competing organisms that could hinder mushroom growth. This isn’t sterilization, which is much more intensive, but a gentler process that gives your mushroom spawn a head start.
1. Chop the Straw: Using your clean scissors or knife, chop the straw into smaller pieces, about 1-3 inches long. This will make it easier to pack into the bottle and will increase the surface area for the mushroom mycelium to colonize.
2. Soak the Straw: Place the chopped straw in your microwave-safe bowl or pot and cover it with water. Make sure all the straw is submerged.
3. Pasteurize the Straw (Microwave Method): If using a microwave, heat the straw and water on high for about 10-15 minutes. The water should be steaming vigorously. This will pasteurize the straw, killing off most of the unwanted microorganisms.
4. Pasteurize the Straw (Stovetop Method): If using a stovetop, bring the water and straw to a simmer for about 60-90 minutes. Maintain a gentle simmer, stirring occasionally to ensure even heating.
5. Cool and Drain: Carefully drain the hot water from the straw. Let the straw cool down to room temperature. It should be moist but not dripping wet. Squeeze out any excess water. The straw should feel like a wrung-out sponge.
Preparing the Plastic Bottle
Now, let’s get the bottle ready to be a mushroom home!
1. Clean and Sanitize: Thoroughly wash the plastic bottle with soap and water. Rinse it well to remove any soap residue. Then, sanitize the inside of the bottle with rubbing alcohol. Let it air dry completely.
2. Cut Ventilation Holes: Using your clean knife or scissors, carefully cut several small holes (about ¼ inch in diameter) around the bottle. These holes will provide ventilation for the mushrooms to breathe. Space them evenly around the bottle, especially near the top and bottom.
3. Optional: Cover Holes with Micropore Tape: If you’re concerned about contamination, you can cover the ventilation holes with micropore tape. This will allow air exchange while preventing dust and other contaminants from entering.
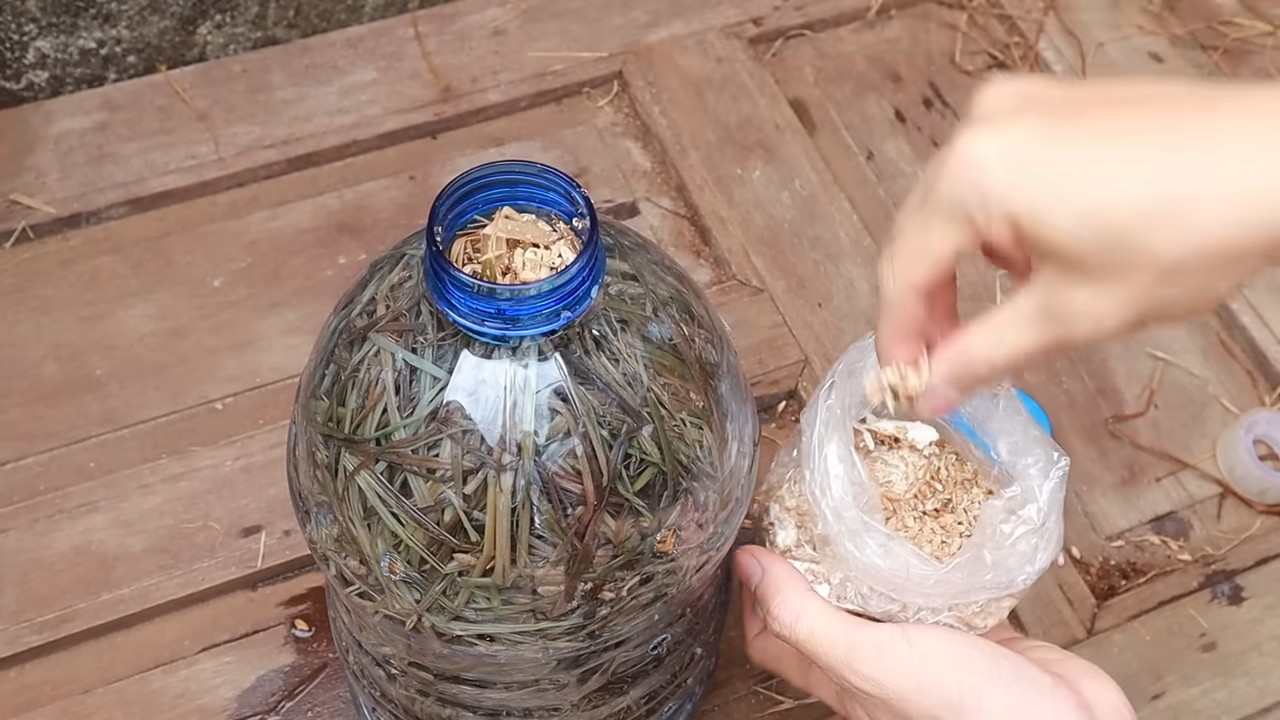
Layering the Substrate and Spawn
This is where the magic happens! We’ll be creating layers of straw and mushroom spawn to encourage colonization.
1. First Layer of Straw: Start by placing a layer of pasteurized straw at the bottom of the bottle, about 2-3 inches thick. Gently pack it down, but don’t compress it too much.
2. First Layer of Spawn: Sprinkle a generous layer of mushroom spawn over the straw. Aim for a thin, even layer.
3. Repeat Layers: Continue layering straw and spawn, alternating between the two. Each layer of straw should be about 2-3 inches thick, and each layer of spawn should be a generous sprinkling.
4. Top Layer of Straw: Finish with a final layer of straw on top. This will help retain moisture and protect the spawn.
5. Optional: Vermiculite Layer: You can add a thin layer of vermiculite on top of the final straw layer to help retain moisture.
Incubation Period
Now comes the waiting game! This is when the mushroom mycelium will colonize the straw.
1. Find a Suitable Location: Place the bottle in a dark, humid, and well-ventilated location. A basement, closet, or under the sink are all good options. The ideal temperature is between 65-75°F (18-24°C).
2. Maintain Humidity: Use your spray bottle to mist the inside of the bottle with water every day or two, or as needed. The straw should be moist but not soaking wet. You can also mist the surrounding area to increase humidity.
3. Monitor Colonization: Over the next few weeks, you should start to see white, fuzzy growth (mycelium) spreading throughout the straw. This is a good sign! It means the mushroom spawn is colonizing the substrate.
4. Patience is Key: The colonization process can take anywhere from 2-4 weeks, depending on the temperature, humidity, and the type of mushroom spawn you’re using. Be patient and don’t disturb the bottle too much.
Fruiting Stage
Once the straw is fully colonized (covered in white mycelium), it’s time to initiate fruiting!
1. Increase Light Exposure: Move the bottle to a location with indirect light. Mushrooms need light to trigger fruiting, but direct sunlight can dry them out.
2. Increase Humidity: Continue to mist the inside of the bottle regularly to maintain high humidity. You can also place a plastic bag loosely over the bottle to create a mini-greenhouse effect, but make sure to leave some openings for ventilation.
3. Maintain Ventilation: Ensure there is adequate ventilation to prevent the buildup of carbon dioxide, which can inhibit fruiting.
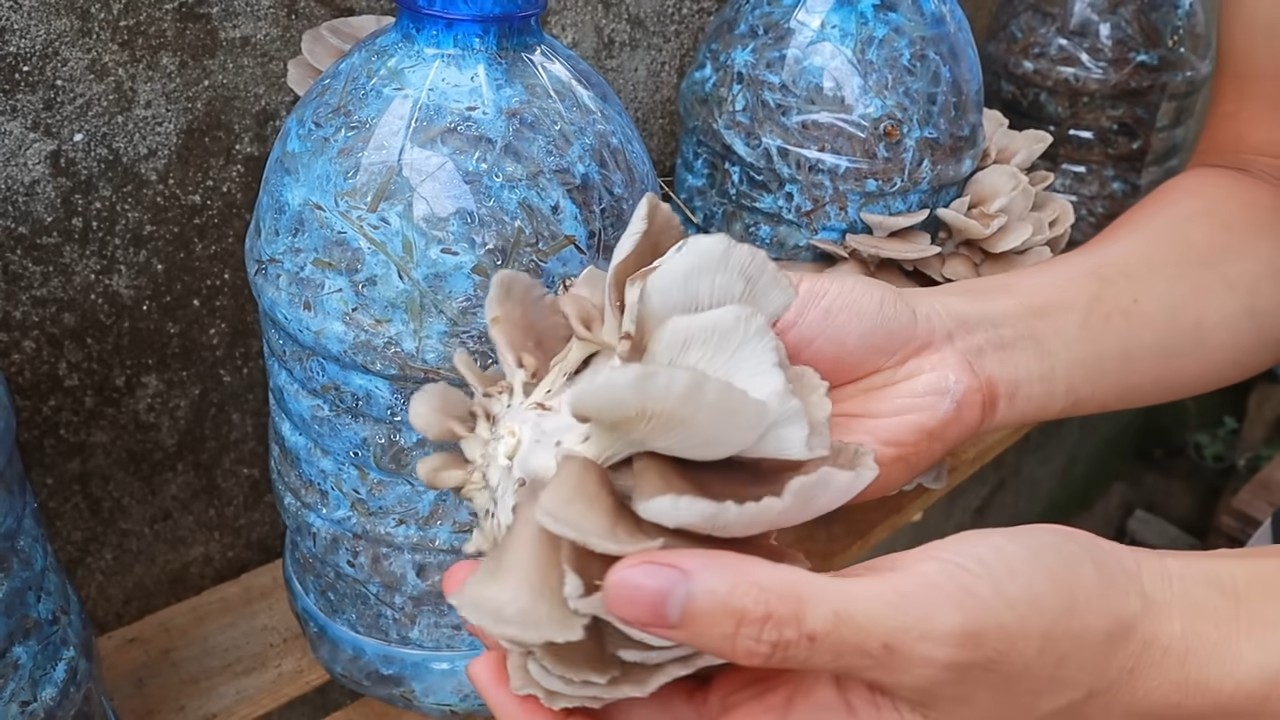
4. Watch for Pinheads: After a few days or weeks, you should start to see small mushroom “pinheads” forming on the surface of the straw. These are the baby mushrooms!
5. Harvesting: As the mushrooms grow, they will double in size each day. Harvest them when the caps are fully formed but before they start to release spores. To harvest, gently twist and pull the mushrooms from the straw.
Post-Harvest Care
After harvesting your first flush of mushrooms, you can encourage a second (or even third) flush by following these steps:
1. Soak the Substrate: After harvesting, soak the straw in water for 12-24 hours. This will rehydrate the substrate and provide the mushrooms with the moisture they need to fruit again.
2. Drain and Return to Incubation: Drain the excess water and return the bottle to its incubation location.
3. Repeat Fruiting Stage: Repeat the fruiting stage steps (increase light, maintain humidity, and ventilation) to encourage a second flush of mushrooms.
Troubleshooting
Sometimes, things don’t go exactly as planned. Here are some common problems and how to fix them:
* Contamination: If you see green, black, or other colored mold growing in the bottle, it means the substrate has been contaminated. Unfortunately, there’s not much you can do at this point except discard the bottle and start over. To prevent contamination, make sure to sanitize everything thoroughly and use sterile techniques.
* Slow Colonization: If the mycelium is growing slowly, it could be due to low temperature, low humidity, or poor ventilation. Try moving the bottle to a warmer location, increasing humidity by misting more frequently, and ensuring there is adequate ventilation.
* No Fruiting: If the straw is fully colonized but no mushrooms are forming, it could be due to lack of light, low humidity, or high carbon dioxide levels. Try moving the bottle to a location with indirect light, increasing humidity
Conclusion
So, there you have it! Transforming a simple plastic bottle into a thriving mushroom growing habitat is not just a fun project; it’s a sustainable, cost-effective, and incredibly rewarding way to cultivate your own delicious fungi. We’ve walked you through the process, highlighting the simplicity and accessibility of this DIY method. Forget expensive mushroom growing kits and complicated setups. With a little patience and a recycled plastic bottle, you can unlock the magic of mycology right in your own home.
But why is this DIY mushroom growing trick a must-try? First and foremost, it’s incredibly eco-friendly. By repurposing plastic bottles, you’re actively reducing waste and contributing to a more sustainable lifestyle. Secondly, it’s a fantastic learning experience. You’ll gain a deeper understanding of the mushroom life cycle, the importance of humidity and ventilation, and the fascinating world of fungi cultivation. And finally, let’s not forget the delicious reward! Imagine the satisfaction of harvesting your own fresh, organic mushrooms, ready to be incorporated into your favorite dishes.
Beyond the basic method we’ve outlined, there’s plenty of room for experimentation and customization. Consider trying different mushroom species. Oyster mushrooms are particularly well-suited for this method due to their aggressive growth and tolerance for a wide range of conditions. You could also experiment with different substrates. While straw and coffee grounds are popular choices, you might also try using shredded cardboard or wood chips. Just be sure to sterilize your substrate properly to prevent contamination.
Another variation to consider is the addition of a humidity tent. If you live in a particularly dry climate, placing a clear plastic bag over your bottle (making sure to provide adequate ventilation) can help maintain the high humidity levels that mushrooms need to thrive. You can also experiment with different lighting conditions. While mushrooms don’t require direct sunlight, they do benefit from some ambient light.
Don’t be afraid to get creative and adapt the method to suit your own needs and resources. The beauty of DIY is that it’s all about experimentation and learning.
We are confident that you will find this project both enjoyable and fruitful. The satisfaction of harvesting your own homegrown mushrooms is truly unparalleled. So, gather your supplies, follow our instructions, and prepare to be amazed by the power of nature.
We encourage you to embark on this exciting journey of DIY mushroom cultivation. And most importantly, we want to hear about your experiences! Share your successes, your challenges, and your creative adaptations in the comments section below. Let’s build a community of mushroom enthusiasts and learn from each other. Happy growing!
Frequently Asked Questions (FAQ)
What type of plastic bottle is best for growing mushrooms?
Ideally, you should use a food-grade plastic bottle, such as those used for water, juice, or soda. Make sure the bottle is clean and free of any residue. Avoid using bottles that have contained harsh chemicals or cleaning products. The size of the bottle will depend on the amount of mushrooms you want to grow, but a 2-liter bottle is a good starting point. Thicker plastic bottles tend to hold moisture better and are more durable, which can be beneficial for long-term cultivation.
How do I sterilize the substrate properly?
Sterilizing the substrate is crucial to prevent contamination from unwanted molds and bacteria. There are several methods you can use:
* **Boiling:** Submerge the substrate in boiling water for at least 60-90 minutes. This is a simple and effective method for smaller quantities of substrate.
* **Steaming:** Place the substrate in a steamer basket above boiling water for 90-120 minutes. This method is gentler than boiling and helps retain more nutrients in the substrate.
* **Pressure Cooking:** This is the most effective method for sterilizing substrate. Place the substrate in a pressure cooker with water and cook at 15 PSI for 90 minutes. This method kills virtually all microorganisms.
After sterilizing, allow the substrate to cool completely before inoculating it with mushroom spawn.
What kind of mushroom spawn should I use?
Oyster mushrooms are generally considered the easiest and most forgiving species for beginners using this method. They are fast-growing and tolerate a wider range of conditions compared to other mushroom varieties. You can purchase oyster mushroom spawn online or from local gardening supply stores. Other options include shiitake or wine cap mushrooms, but these may require more specific conditions and attention. Always ensure you are purchasing spawn from a reputable source to avoid contamination.
How often should I water the mushrooms?
The frequency of watering depends on the humidity levels in your environment. The goal is to keep the substrate moist but not waterlogged. Check the moisture level of the substrate daily by gently pressing on it. If it feels dry to the touch, mist it lightly with water using a spray bottle. Avoid spraying the mushrooms directly, as this can cause them to rot. A humidity tent can help maintain consistent moisture levels and reduce the need for frequent watering.
How long does it take for mushrooms to grow?
The time it takes for mushrooms to grow depends on several factors, including the mushroom species, the temperature, and the humidity levels. Generally, you can expect to see pins (tiny mushroom formations) within 1-2 weeks of inoculation. From there, it takes another 3-7 days for the mushrooms to mature and be ready for harvest. Keep in mind that these are just estimates, and the actual time may vary.
What if my mushroom growing bottle gets contaminated?
Contamination is a common issue in mushroom cultivation. If you notice any green, black, or other unusual molds growing in your bottle, it’s likely contaminated. Unfortunately, there’s not much you can do to save a contaminated bottle. The best course of action is to dispose of it properly to prevent the contamination from spreading. Thoroughly clean and disinfect your growing area before starting a new batch.
How do I harvest the mushrooms?
Harvest the mushrooms when the caps are fully developed but before they start to release spores. To harvest, gently twist and pull the mushrooms from the substrate. Avoid cutting them, as this can leave behind a stump that can rot and attract pests. After harvesting, you can often get multiple flushes (subsequent harvests) from the same bottle. Simply continue to mist the substrate and maintain the proper conditions.
Can I reuse the plastic bottle for another batch of mushrooms?
Yes, you can reuse the plastic bottle for multiple batches of mushrooms. However, it’s important to thoroughly clean and disinfect the bottle between batches to prevent contamination. Wash the bottle with soap and water, and then soak it in a solution of bleach and water (1 part bleach to 10 parts water) for at least 30 minutes. Rinse the bottle thoroughly before using it again.
What are the ideal temperature and humidity conditions for growing mushrooms in a plastic bottle?
Oyster mushrooms generally thrive in temperatures between 60-75°F (15-24°C) and humidity levels between 80-90%. Maintaining these conditions can be challenging, especially in dry climates. Using a humidity tent, as mentioned earlier, can help. You can also place the bottle in a location with stable temperature and humidity, such as a basement or a shaded area. Monitoring the temperature and humidity with a thermometer and hygrometer can help you make adjustments as needed.
Is growing mushrooms in a plastic bottle safe to eat?
Yes, if you follow proper hygiene and sterilization procedures, the mushrooms grown in a plastic bottle are safe to eat. However, it’s crucial to ensure that the bottle is made of food-grade plastic and that you are using a reputable source of mushroom spawn. Always cook the mushrooms thoroughly before eating them to kill any potential bacteria or pathogens. If you are unsure about the safety of your mushrooms, it’s best to err on the side of caution and discard them.
Leave a Comment