
Plastic bottle mini garden: Ever dreamed of having a lush, green space but thought you didn’t have the room? I’m here to tell you that you absolutely can, and it’s easier (and more eco-friendly!) than you think! We’re diving into the wonderful world of upcycling and creating adorable mini gardens using something you probably already have lying around: plastic bottles.
The concept of container gardening, in general, has been around for centuries. From the hanging gardens of Babylon to the humble window boxes of Victorian England, people have always found ways to cultivate plants in limited spaces. But the modern twist of using recycled materials adds a whole new layer of sustainability and creativity to the practice.
In today’s world, where space is often a premium and environmental consciousness is growing, learning how to create a plastic bottle mini garden is more relevant than ever. Not only does it allow you to grow fresh herbs, vegetables, or beautiful flowers even in the smallest apartment, but it also helps reduce plastic waste. Plus, it’s a fantastic project for kids, teaching them about gardening, recycling, and the importance of caring for our planet. So, let’s get our hands dirty (figuratively, for now!) and transform those discarded bottles into thriving little ecosystems!
DIY Delight: Transforming Plastic Bottles into a Thriving Mini Garden
Hey there, fellow DIY enthusiasts! Today, I’m super excited to share a fantastic project that’s not only fun and creative but also eco-friendly. We’re going to turn those discarded plastic bottles into adorable and functional mini gardens. Get ready to give your plants a unique home and add a touch of green to your space, all while reducing waste!
What You’ll Need: Your Mini Garden Arsenal
Before we dive in, let’s gather our supplies. This is a pretty straightforward project, so you probably have most of these items lying around already.
* Plastic Bottles: The stars of our show! Any size will do, but I find 2-liter bottles or even smaller water bottles work best. Make sure they’re clean and dry.
* Scissors or a Craft Knife: For cutting the bottles. Be careful and always supervise children if they’re helping.
* Potting Soil: The lifeblood of our garden. Choose a good quality potting mix that’s suitable for the plants you want to grow.
* Seeds or Seedlings: Decide what you want to grow! Herbs, succulents, flowers, even small vegetables can thrive in these mini gardens.
* Water: To keep our plants happy and hydrated.
* Gravel or Small Stones: For drainage. This is crucial to prevent root rot.
* Optional: Paint, Markers, Decorative Items: To personalize your mini gardens and make them truly unique.
* Optional: Twine or String: If you want to hang your mini gardens.
* Optional: Ruler or Measuring Tape: To ensure accurate cuts, especially if you’re making multiple gardens.
* Optional: Sandpaper: To smooth out any rough edges after cutting the plastic.
Preparing the Bottles: The Foundation of Our Garden
Okay, let’s get our hands dirty! This is where we transform those plastic bottles into something special.
1. Clean and Dry the Bottles: Make sure your bottles are thoroughly cleaned and dried. Remove any labels or sticky residue. A little soap and water usually does the trick.
2. Decide on Your Design: There are several ways to cut the bottles, depending on the look you’re going for. Here are a few ideas:
* Horizontal Garden: Cut the bottle horizontally, about halfway down. This creates a wide, open container.
* Vertical Garden: Cut a rectangular opening on one side of the bottle. This is great for hanging gardens.
* Self-Watering Garden: Cut the bottle in half. Invert the top half into the bottom half, with the bottle cap removed. This creates a reservoir of water.
3. Mark Your Cut Lines: Use a marker to draw the lines where you want to cut. This will help you make a clean and even cut. If you’re making multiple gardens, use a ruler to ensure consistency.
4. Cut the Bottles: Carefully cut along the marked lines using scissors or a craft knife. If you’re using a craft knife, be extra cautious and use a cutting mat to protect your work surface.
5. Smooth the Edges (Optional): If the cut edges are rough, use sandpaper to smooth them out. This will prevent you from accidentally cutting yourself later.
Creating Your Mini Garden: Bringing Life to Plastic
Now for the fun part – planting! This is where we bring our mini gardens to life.
1. Add Drainage: Place a layer of gravel or small stones at the bottom of the bottle. This will help with drainage and prevent the roots from sitting in water. About an inch or two should be sufficient.
2. Add Potting Soil: Fill the bottle with potting soil, leaving about an inch of space at the top. Gently pat down the soil to remove any air pockets.
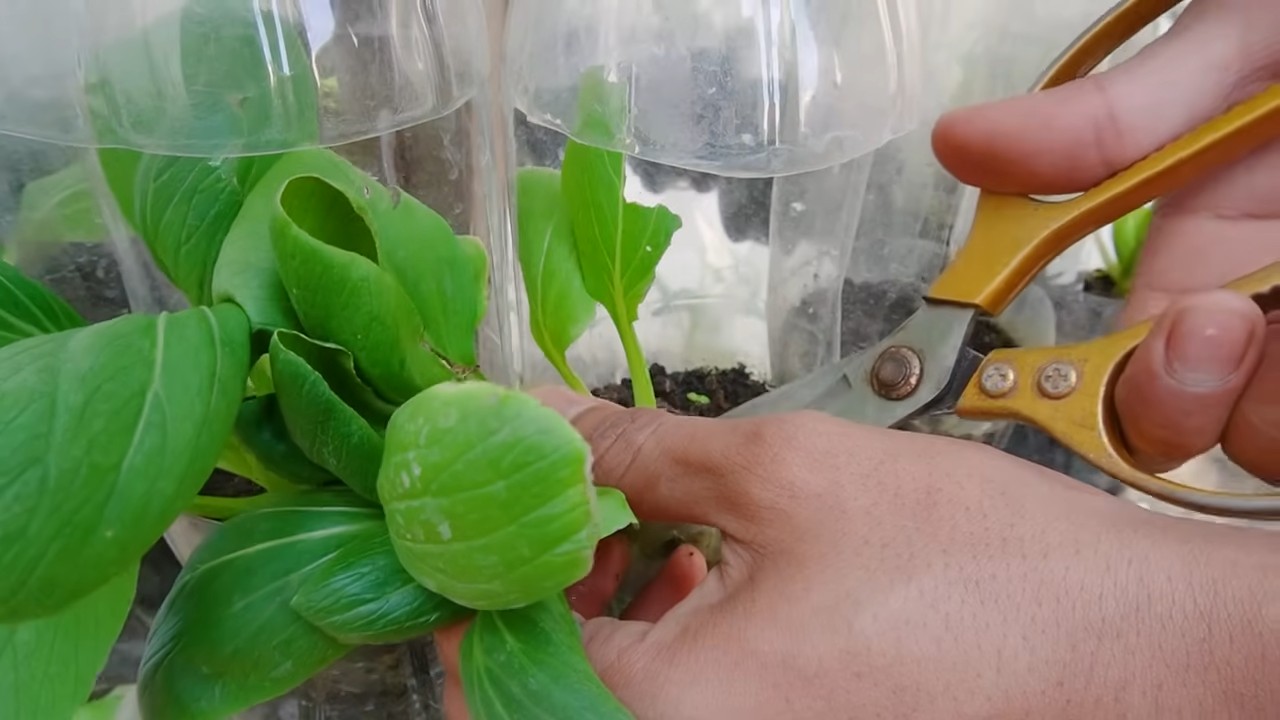
3. Plant Your Seeds or Seedlings: If you’re using seeds, follow the instructions on the seed packet for planting depth and spacing. If you’re using seedlings, carefully remove them from their containers and plant them in the soil.
4. Water Thoroughly: Water the soil until it’s evenly moist, but not soggy. Allow any excess water to drain out.
5. Add Decorative Touches (Optional): Now’s the time to personalize your mini garden! You can paint the bottle, add decorative stones, or even create a miniature landscape. Let your creativity run wild!
Hanging Your Mini Garden (Optional): Elevating Your Green Space
If you want to hang your mini gardens, here’s how:
1. Drill Holes (Optional): If you’re using a thick plastic bottle, you may need to drill small holes near the top for the twine or string. Be careful not to crack the plastic.
2. Attach Twine or String: Thread twine or string through the holes and tie a knot to secure it. Make sure the twine is long enough to hang the garden at your desired height.
3. Hang Your Garden: Find a suitable spot to hang your garden. Make sure it’s in a location that receives adequate sunlight and is protected from strong winds.
Specific Garden Types: Tailoring Your Approach
Let’s explore some specific types of mini gardens you can create with plastic bottles:
Herb Garden: Aromatic Delights
* Choose Your Herbs: Basil, mint, parsley, chives, and oregano are all great choices for a mini herb garden.
* Planting: Plant each herb in its own bottle or combine compatible herbs in a larger bottle.
* Care: Water regularly and provide plenty of sunlight. Harvest herbs as needed.
Succulent Garden: Low-Maintenance Beauty
* Choose Your Succulents: Echeverias, sedums, and sempervivums are popular choices for succulent gardens.
* Planting: Use well-draining soil specifically formulated for succulents.
* Care: Water sparingly, allowing the soil to dry out completely between waterings. Provide plenty of sunlight.
Flower Garden: Burst of Color
* Choose Your Flowers: Petunias, pansies, and impatiens are good options for a mini flower garden.
* Planting: Use a good quality potting mix and provide adequate drainage.
* Care: Water regularly and fertilize as needed. Deadhead spent flowers to encourage more blooms.
Self-Watering Garden: Effortless Hydration
* Cut the Bottle: Cut the bottle in half.
* Invert the Top: Invert the top half of the bottle into the bottom half, with the bottle cap removed.
* Add a Wick (Optional): You can add a piece of cotton cloth or rope through the bottle neck to act as a wick, drawing water up to the soil.
* Fill with Water: Fill the bottom half of the bottle with water.
* Plant: Add soil to the top half and plant your seeds or seedlings.
Tips and Tricks: Ensuring Success
Here are a few extra tips to help you create a thriving mini garden:
* Choose the Right Plants: Consider the amount of sunlight your garden will receive and choose plants that are suited to those conditions.
* Don’t Overwater: Overwatering is a common mistake that can lead to root rot. Allow the soil to dry out slightly between waterings.
* Fertilize Regularly: Use a balanced fertilizer to provide your plants with the nutrients they need to thrive.
* Repot as Needed: As your plants grow, they may need to be repotted into larger containers.
* Get Creative with Decoration: Personalize your mini gardens with paint, markers, stones, and other decorative items.
* Monitor for Pests: Keep an eye out for pests and take action to control them if necessary.
* Recycle Responsibly: If you ever need to dispose of your mini gardens, be sure to recycle the plastic bottles properly.
Troubleshooting: Addressing Common Issues
Even with the best planning, you might encounter a few hiccups along the way. Here’s how to tackle some common problems:
* Yellowing Leaves: This could be a sign of overwatering, underwatering, or nutrient deficiency. Adjust your watering schedule and fertilize as needed.
* Wilting Plants: This could be due to lack of water, excessive heat, or root rot. Water thoroughly, provide shade, and ensure good drainage.
* Pests: Identify the pest and use an appropriate insecticide or natural pest control method.
* Slow Growth: This could be due to lack of sunlight, poor soil, or nutrient deficiency. Provide more sunlight, use a better quality potting mix, and fertilize regularly.
* Mold Growth: This is often a sign of overwatering or poor ventilation. Reduce watering and improve air circulation.
Conclusion: A Sustainable and Beautiful Project
Creating a mini garden from plastic bottles is a
Conclusion
So, there you have it! Transforming a simple plastic bottle into a thriving mini garden is not just a fun project; it’s a sustainable, space-saving, and incredibly rewarding way to bring a touch of nature into your life. We’ve walked you through the process, highlighting the ease and accessibility of this DIY trick. But why is this a must-try?
Firstly, it’s an eco-conscious choice. By repurposing plastic bottles, you’re actively reducing waste and contributing to a more sustainable lifestyle. In a world grappling with plastic pollution, every little bit helps, and this project offers a tangible way to make a difference.
Secondly, it’s incredibly versatile. Whether you live in a sprawling house with a large garden or a tiny apartment with limited space, a plastic bottle mini garden can fit seamlessly into your environment. It’s perfect for balconies, windowsills, patios, or even indoor spaces with sufficient sunlight.
Thirdly, it’s a fantastic educational tool. If you have children, this project offers a hands-on learning experience about plant life cycles, sustainability, and the importance of recycling. It’s a fun and engaging way to teach them valuable lessons about the environment.
But the benefits don’t stop there. Imagine the satisfaction of harvesting your own herbs or vegetables from your mini garden. Fresh basil for your pasta, mint for your tea, or even small cherry tomatoes for your salad – all grown with your own hands, in a recycled plastic bottle. The possibilities are endless!
Ready to take your mini garden to the next level? Consider these variations:
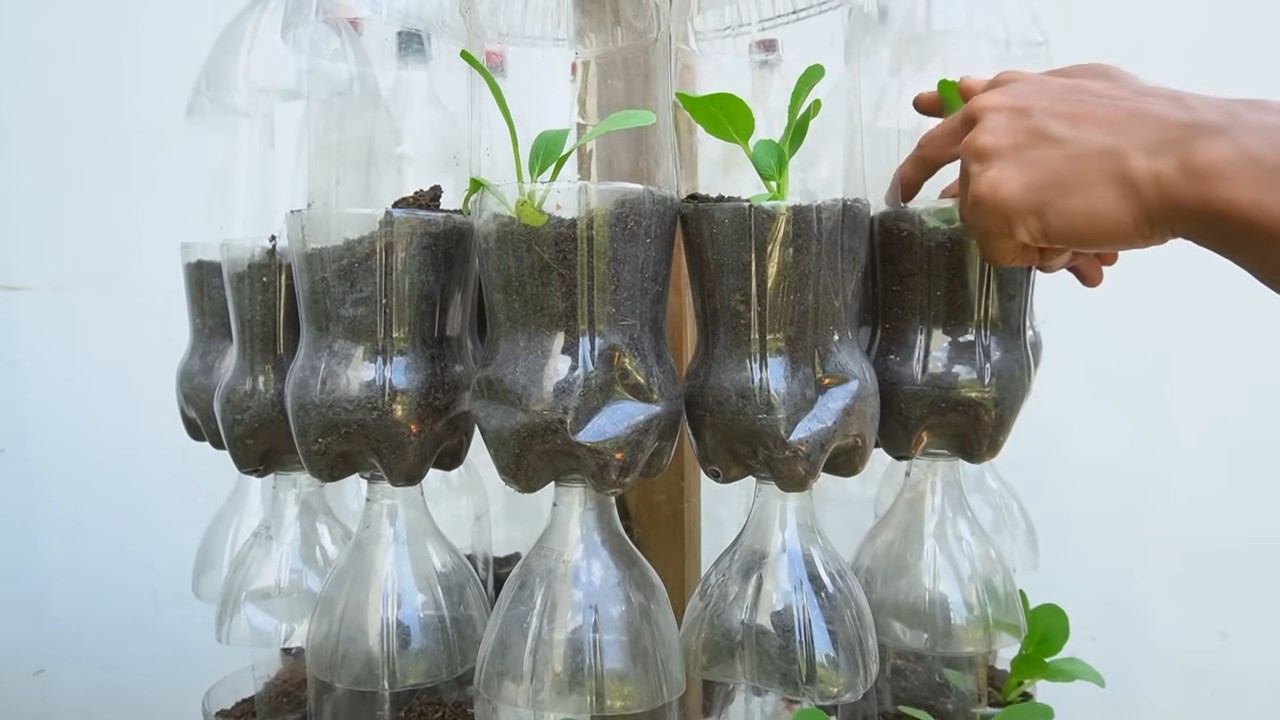
* Vertical Garden: Create a stunning vertical garden by hanging multiple plastic bottle planters on a wall or fence. This is a great way to maximize space and add a unique visual element to your outdoor area.
* Herb Spiral: Arrange your plastic bottle planters in a spiral shape to create a beautiful and functional herb garden. This design allows for different microclimates, catering to the specific needs of various herbs.
* Aquaponic System: For the more adventurous, explore creating a simple aquaponic system by integrating a small fish tank with your plastic bottle planters. The fish waste provides nutrients for the plants, while the plants filter the water for the fish.
* Terrarium Style: Create a closed terrarium within a larger plastic bottle. This is perfect for moisture-loving plants like ferns and mosses.
Don’t be afraid to experiment with different types of plants, soil mixtures, and designs. The beauty of this project is its adaptability and the opportunity to personalize it to your own preferences and needs.
We are confident that you’ll find this DIY trick to be both enjoyable and rewarding. So, gather your plastic bottles, grab your gardening tools, and get ready to create your own miniature oasis. We encourage you to try this plastic bottle mini garden project and share your experiences with us! Post photos of your creations on social media using #PlasticBottleGardenDIY and let us know what you’ve learned. We can’t wait to see what you come up with! Happy gardening!
Frequently Asked Questions (FAQ)
What types of plants are best suited for a plastic bottle mini garden?
The best plants for your plastic bottle mini garden are those that don’t require a lot of space for their root systems and thrive in relatively small containers. Herbs like basil, mint, chives, and oregano are excellent choices. Leafy greens such as lettuce, spinach, and kale also do well. For vegetables, consider smaller varieties like cherry tomatoes, chili peppers, and radishes. Succulents and cacti are also great options, especially if you’re looking for low-maintenance plants. When choosing plants, consider the amount of sunlight your mini garden will receive and select plants that are appropriate for those conditions.
What kind of soil should I use for my plastic bottle mini garden?
Using the right soil is crucial for the success of your mini garden. Avoid using regular garden soil, as it can be too dense and may not drain well in a container. Instead, opt for a high-quality potting mix that is specifically formulated for container gardening. These mixes are typically lighter and more porous, allowing for better drainage and aeration. You can also amend your potting mix with compost or other organic matter to provide additional nutrients for your plants. For succulents and cacti, use a well-draining cactus mix.
How often should I water my plastic bottle mini garden?
The frequency of watering will depend on several factors, including the type of plants you’re growing, the climate, and the type of soil you’re using. As a general rule, water your plants when the top inch of soil feels dry to the touch. Avoid overwatering, as this can lead to root rot. When watering, water thoroughly until water drains out of the drainage holes. During hot weather, you may need to water more frequently. Succulents and cacti require less frequent watering than other plants.
How much sunlight does my plastic bottle mini garden need?
The amount of sunlight your mini garden needs will depend on the type of plants you’re growing. Most herbs and vegetables require at least six hours of sunlight per day. Leafy greens can tolerate partial shade. Succulents and cacti generally prefer full sun. If you’re growing your mini garden indoors, place it near a sunny window or supplement with artificial grow lights. Observe your plants closely and adjust their position as needed to ensure they’re getting the right amount of light.
How do I prevent pests and diseases in my plastic bottle mini garden?
Prevention is key when it comes to pests and diseases. Start by using healthy, disease-free plants and high-quality potting mix. Regularly inspect your plants for signs of pests or diseases, such as aphids, spider mites, or powdery mildew. If you spot any problems, address them promptly. You can use organic pest control methods, such as insecticidal soap or neem oil, to control pests. Ensure good air circulation around your plants to prevent fungal diseases. Avoid overwatering, as this can create a favorable environment for diseases.
How do I ensure proper drainage in my plastic bottle mini garden?
Proper drainage is essential to prevent root rot. Make sure to create drainage holes in the bottom of your plastic bottles before planting. You can also add a layer of gravel or pebbles to the bottom of the bottle to improve drainage. Use a well-draining potting mix. Avoid overwatering, as this can lead to waterlogged soil. If you notice that the soil is consistently wet, consider adding more drainage holes or using a different potting mix.
Can I grow my plastic bottle mini garden indoors?
Yes, you can absolutely grow your plastic bottle mini garden indoors! Choose plants that are well-suited for indoor growing conditions, such as herbs, leafy greens, and succulents. Place your mini garden near a sunny window or supplement with artificial grow lights. Ensure good air circulation around your plants. Monitor the moisture levels in the soil and water as needed. With a little care and attention, you can enjoy a thriving indoor mini garden year-round.
How do I fertilize my plastic bottle mini garden?
Plants grown in containers require regular fertilization, as the nutrients in the potting mix will eventually be depleted. Use a balanced liquid fertilizer diluted to half strength. Fertilize your plants every two to four weeks during the growing season. Avoid over-fertilizing, as this can damage your plants. You can also add compost or other organic matter to the soil to provide a slow-release source of nutrients.
How do I clean and maintain my plastic bottle mini garden?
Regular cleaning and maintenance will help keep your mini garden healthy and thriving. Remove any dead or yellowing leaves. Wipe down the plastic bottles to remove any dirt or debris. Check for pests and diseases regularly. Prune your plants as needed to encourage growth and maintain their shape. Repot your plants into larger containers as they outgrow their current ones. With a little care and attention, your plastic bottle mini garden will provide you with years of enjoyment.

Leave a Comment