
Tomato planting method: it’s more than just sticking a seedling in the ground! Imagine biting into a juicy, sun-ripened tomato you grew yourself – bursting with flavor that store-bought tomatoes can only dream of. That’s the magic we’re unlocking today! For generations, cultivating tomatoes has been a cherished tradition, from the ancient Aztecs who first domesticated them to Italian grandmothers passing down secret sauce recipes. But let’s face it, sometimes our tomato dreams don’t quite match reality. We end up with leggy plants, blossom end rot, or a disappointing harvest.
That’s where this DIY guide comes in. I’m going to share some game-changing tricks and hacks that will transform your tomato planting method and guarantee you a bumper crop. We’ll delve into everything from soil preparation and companion planting to clever staking techniques and watering strategies. These aren’t just random tips; they’re tried-and-true methods that I’ve personally used to achieve tomato-growing success year after year. So, ditch the frustration and get ready to harvest the most delicious tomatoes you’ve ever tasted! Let’s get our hands dirty and turn your garden into a tomato paradise!
DIY Tomato Planting: From Seed to Salsa!
Hey there, fellow garden enthusiasts! I’m so excited to share my tried-and-true method for planting tomatoes. Whether you’re a seasoned gardener or just starting out, this guide will walk you through every step, ensuring you have a bountiful harvest of juicy, delicious tomatoes. Get ready to enjoy homemade salsa, fresh salads, and everything in between!
Choosing Your Tomato Varieties
Before we get our hands dirty, let’s talk about tomato varieties. There are literally hundreds to choose from, and the best one for you depends on your climate, space, and taste preferences.
* Determinate vs. Indeterminate: This is crucial! Determinate tomatoes grow to a certain size and produce all their fruit at once, making them great for canning. Indeterminate tomatoes keep growing and producing fruit throughout the season. I personally prefer indeterminate varieties because I love having fresh tomatoes all summer long.
* Heirloom vs. Hybrid: Heirloom tomatoes are open-pollinated varieties that have been passed down through generations. They often have unique flavors and colors, but can be more susceptible to diseases. Hybrid tomatoes are bred for specific traits like disease resistance and higher yields.
* Consider Your Climate: If you live in a cooler climate, choose early-maturing varieties. If you have a long, hot growing season, you can experiment with later-maturing varieties.
* Think About Space: If you’re gardening in containers, choose compact or dwarf varieties. If you have plenty of space, you can grow larger, vining varieties.
* My Personal Favorites: I always grow ‘Early Girl’ for early harvests, ‘Brandywine’ for its amazing flavor, and ‘Roma’ for making sauce.
Starting Seeds Indoors (Optional, but Recommended!)
Starting your tomato seeds indoors gives you a head start on the growing season, especially if you live in a cooler climate. I highly recommend it!
* When to Start: About 6-8 weeks before the last expected frost in your area.
* What You’ll Need:
* Seed starting trays or small pots
* Seed starting mix (not regular potting soil!)
* Tomato seeds
* Grow lights (or a very sunny windowsill)
* Spray bottle
* Heat mat (optional, but helpful)
Step-by-Step Instructions:
1. Prepare Your Seed Starting Trays: Fill your seed starting trays or pots with seed starting mix. Gently tap the trays to settle the mix.
2. Sow the Seeds: Make a small indentation (about 1/4 inch deep) in the center of each cell or pot. Place 2-3 tomato seeds in each indentation. Cover the seeds with a thin layer of seed starting mix.
3. Water Gently: Use a spray bottle to gently moisten the soil. Avoid overwatering, which can lead to damping off (a fungal disease that kills seedlings).
4. Provide Warmth: Place the seed starting trays on a heat mat (if using) and cover them with a clear plastic dome or plastic wrap to create a humid environment.
5. Provide Light: Once the seeds germinate (usually within 5-10 days), remove the plastic dome and place the trays under grow lights or in a very sunny windowsill. If using grow lights, keep them a few inches above the seedlings.
6. Water Regularly: Keep the soil consistently moist, but not soggy. Water when the top inch of soil feels dry to the touch.
7. Thin the Seedlings: Once the seedlings have their first true leaves (the leaves that look like miniature tomato leaves), thin them to one seedling per cell or pot. Snip off the weaker seedlings at the soil line with scissors. Don’t pull them out, as this can disturb the roots of the remaining seedling.
8. Fertilize: Once the seedlings have a few sets of true leaves, start fertilizing them with a diluted liquid fertilizer specifically formulated for seedlings. Follow the instructions on the fertilizer package.
9. Harden Off: About a week before you plan to transplant the seedlings outdoors, you’ll need to “harden them off.” This means gradually exposing them to outdoor conditions to help them acclimate. Start by placing the seedlings outdoors in a sheltered location for a few hours each day, gradually increasing the amount of time they spend outdoors. Protect them from direct sunlight and strong winds.
Preparing Your Garden Bed
Tomatoes need plenty of sunshine and well-drained soil. Here’s how to prepare your garden bed for success:
* Choose a Sunny Location: Tomatoes need at least 6-8 hours of direct sunlight per day.
* Test Your Soil: A soil test will tell you the pH and nutrient levels of your soil. Tomatoes prefer a slightly acidic soil pH of 6.0-6.8.
* Amend the Soil: Amend your soil with compost or other organic matter to improve drainage and fertility. I like to add a generous amount of composted manure to my tomato beds.
* Remove Weeds: Remove all weeds from the planting area. Weeds compete with tomatoes for nutrients and water.
Step-by-Step Instructions:
1. Clear the Area: Remove any existing plants, rocks, and debris from the planting area.
2. Till or Dig the Soil: Till the soil to a depth of at least 12 inches, or dig it over with a shovel. This will loosen the soil and make it easier for the tomato roots to grow.
3. Amend the Soil: Spread a 2-3 inch layer of compost or other organic matter over the soil.
4. Incorporate the Amendments: Use a tiller or shovel to incorporate the compost into the soil.
5. Smooth the Surface: Rake the soil smooth and level.
Transplanting Your Tomato Seedlings
Now for the exciting part – getting those little seedlings into the ground!
* When to Transplant: After the last expected frost and when the soil has warmed up to at least 60°F (15°C).
* What You’ll Need:
* Tomato seedlings
* Trowel or shovel
* Watering can or hose
* Tomato cages or stakes
* Fertilizer (tomato-specific)
* Mulch (straw, wood chips, or shredded leaves)
Step-by-Step Instructions:
1. Dig the Holes: Dig holes that are slightly larger than the root balls of your tomato seedlings. Space the holes about 2-3 feet apart, depending on the variety.
2. Add Fertilizer: Add a handful of tomato-specific fertilizer to each hole. Mix the fertilizer into the soil at the bottom of the hole.
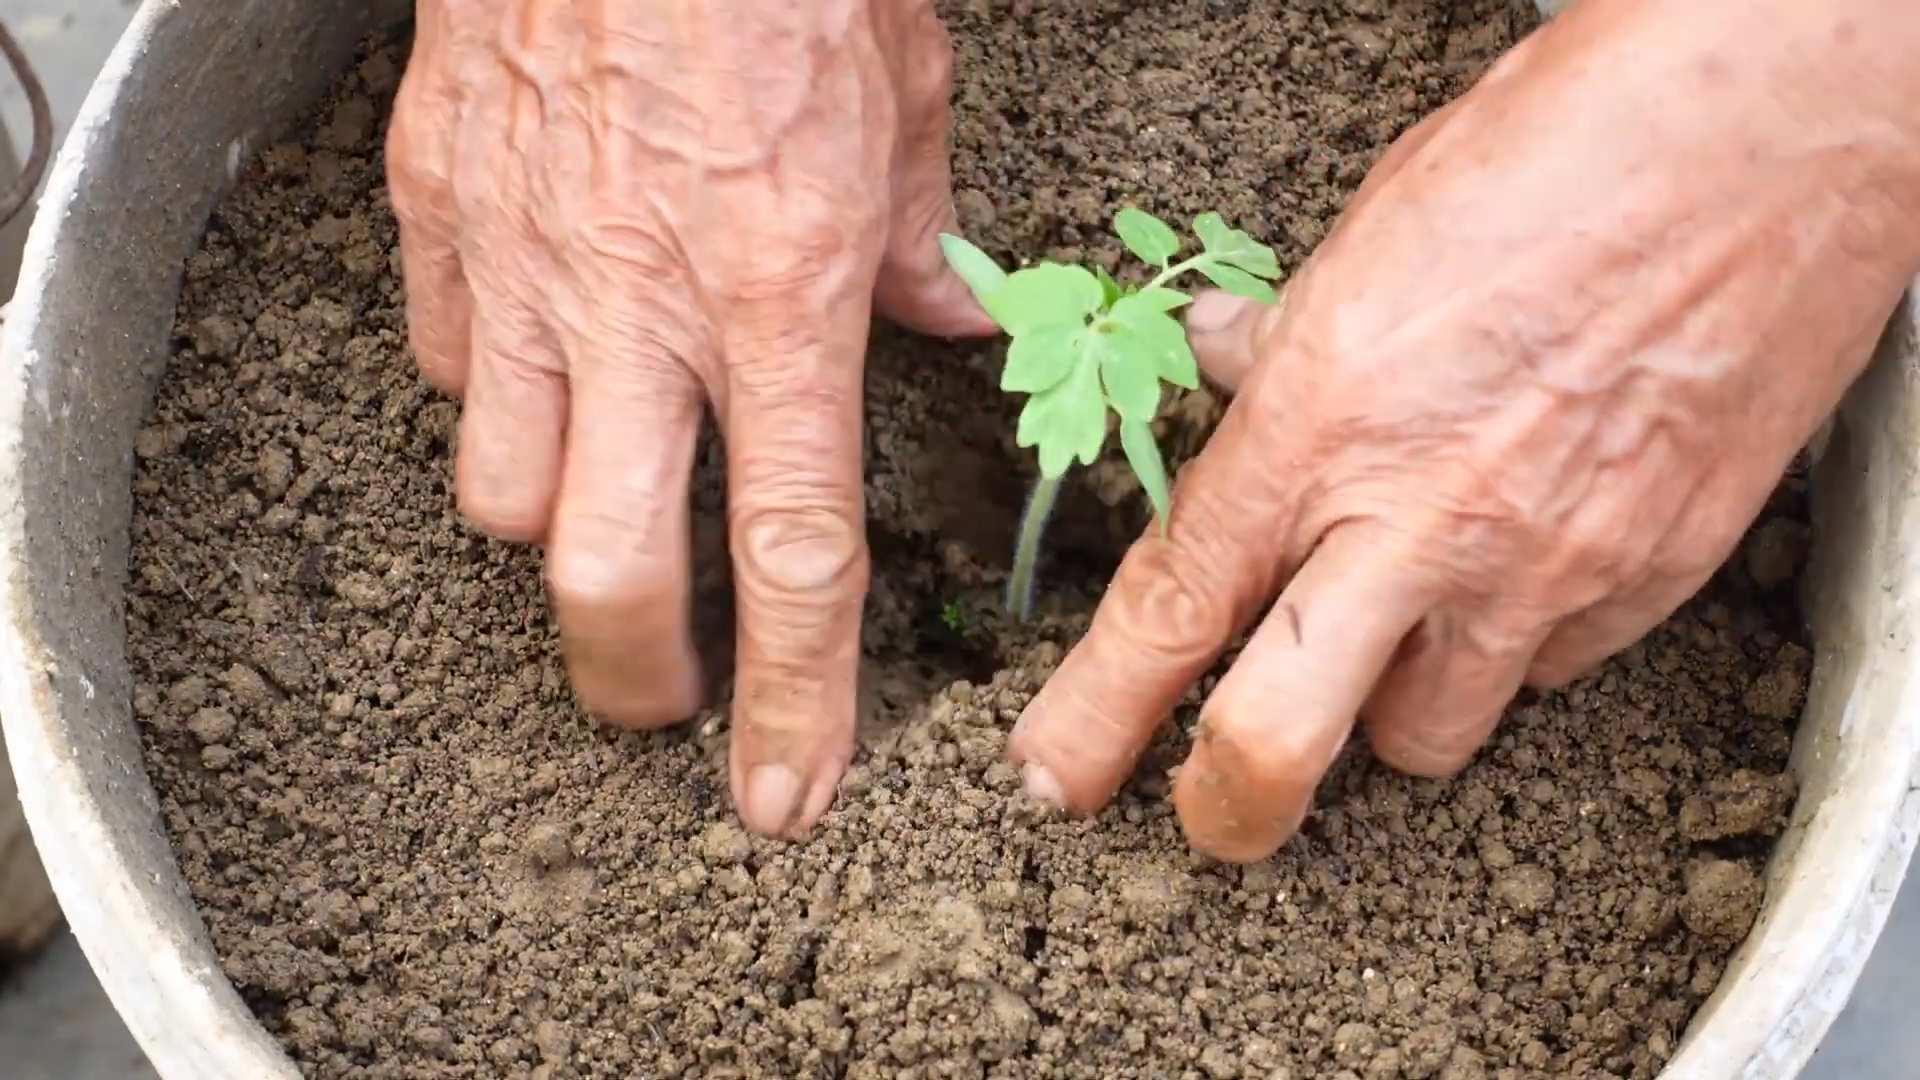
3. Remove the Seedlings: Gently remove the tomato seedlings from their trays or pots. If the roots are tightly bound, gently loosen them with your fingers.
4. Plant Deeply: This is the secret to strong tomato plants! Plant the seedlings deeply, burying the stem up to the first set of leaves. Tomatoes can grow roots along their stems, which will make them stronger and more resilient.
5. Water Thoroughly: Water the seedlings thoroughly after planting.
6. Add Support: Install tomato cages or stakes to support the plants as they grow. I prefer cages because they provide more support and prevent the plants from sprawling on the ground.
7. Mulch: Apply a layer of mulch around the tomato plants to help retain moisture, suppress weeds, and regulate soil temperature.
Caring for Your Tomato Plants
Once your tomato plants are in the ground, it’s important to provide them with the care they need to thrive.
* Watering: Water deeply and regularly, especially during hot, dry weather. Aim to water at the base of the plants to avoid wetting the foliage, which can lead to disease.
* Fertilizing: Fertilize your tomato plants every 2-3 weeks with a tomato-specific fertilizer.
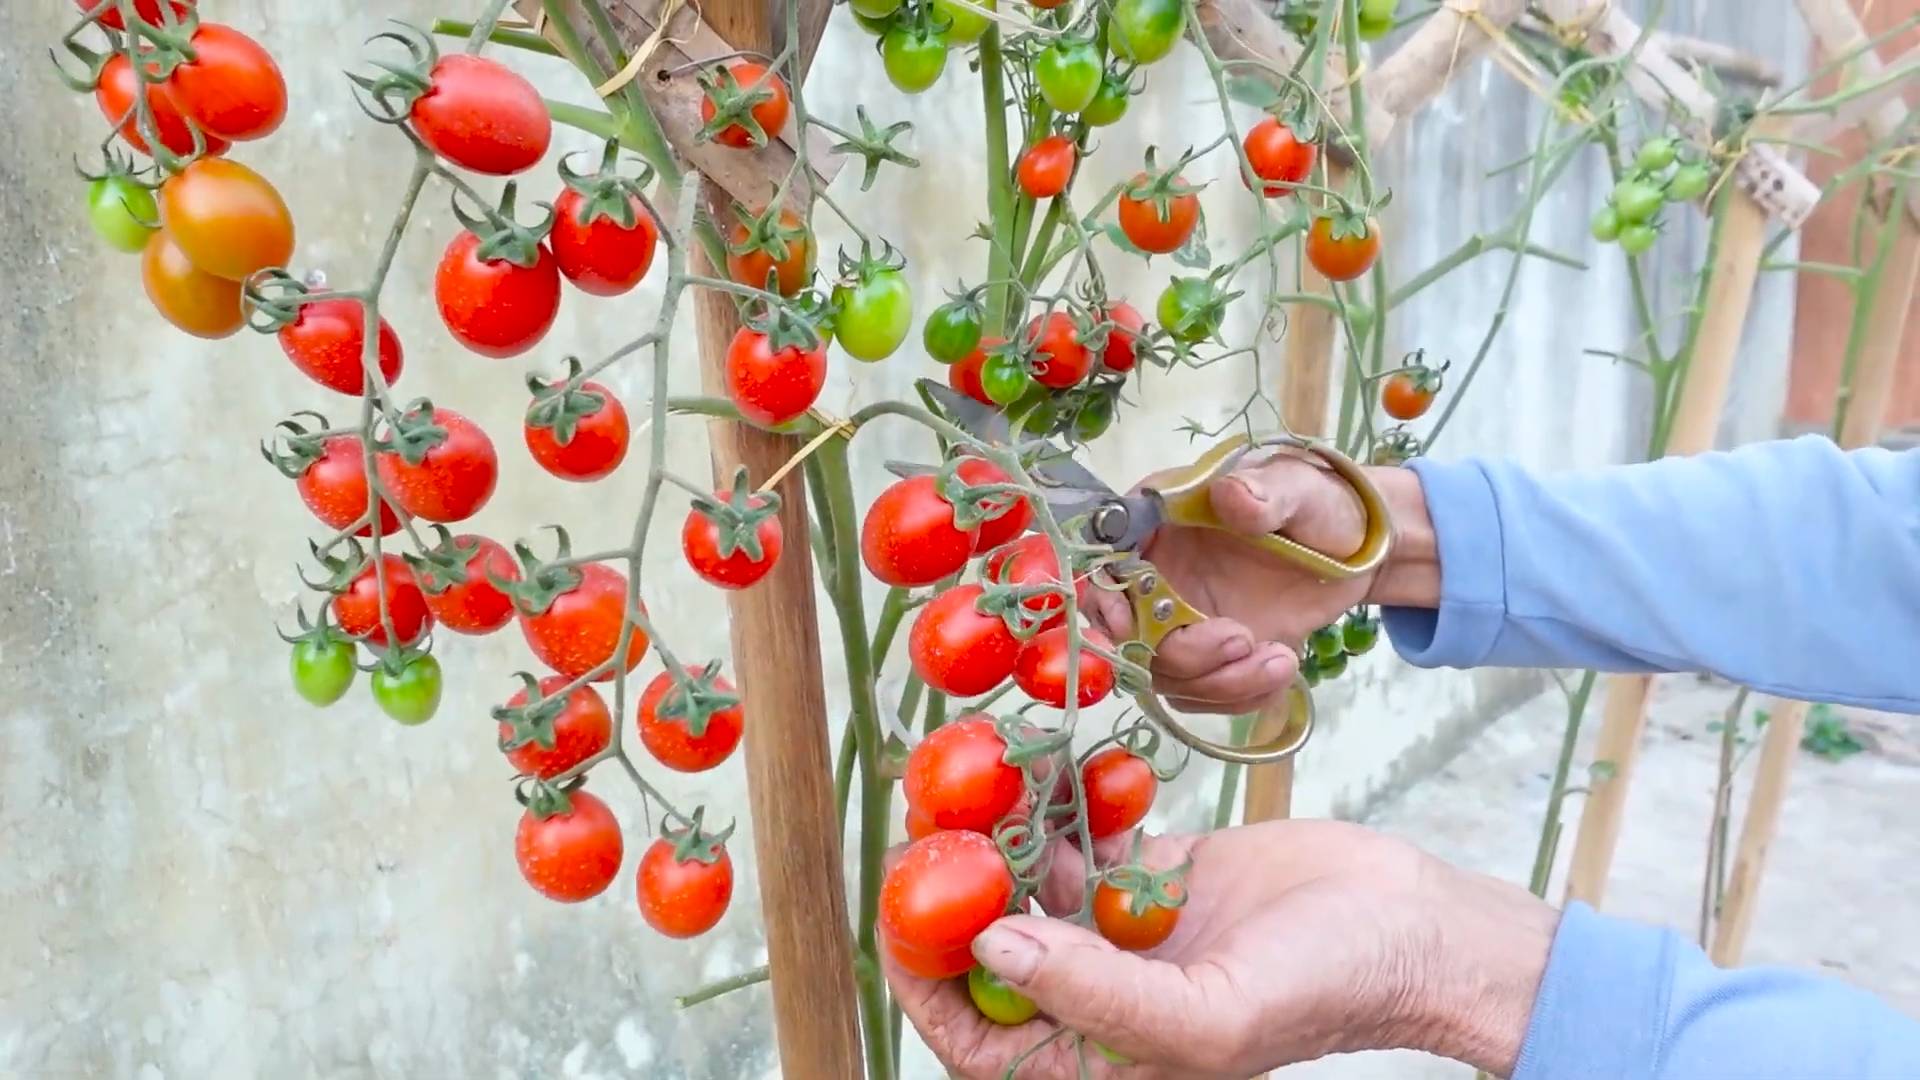
* Pruning: Prune your tomato plants to improve air circulation and encourage fruit production. Remove suckers (the small shoots that grow between the main stem and the branches) from indeterminate varieties.
* Pest and Disease Control: Monitor your tomato plants regularly for pests and diseases. Common tomato pests include aphids, tomato hornworms, and whiteflies. Common tomato diseases include early blight, late blight, and blossom end rot. Treat any problems promptly with appropriate organic or chemical controls.
* Blossom End Rot Prevention: Blossom end rot, characterized by a dark, leathery spot on the bottom of the tomato, is caused by a calcium deficiency. To prevent it, ensure your soil has adequate calcium and water consistently. Adding crushed eggshells to the planting hole can also help.
Step-by-Step Instructions:
1. Watering: Water deeply at the base of the plants, aiming for about 1-2 inches of water per week. Use
Conclusion
So, there you have it! This simple yet incredibly effective DIY tomato planting method is more than just a gardening hack; it’s a pathway to a bountiful harvest and a deeper connection with the food you grow. We’ve walked you through the steps, highlighting the science behind why this technique works so well – from fostering robust root systems to providing essential nutrients right where your tomato plants need them most.
Why is this a must-try? Because it’s a game-changer for both novice and experienced gardeners alike. Imagine fewer instances of blossom end rot, stronger, healthier plants that are more resistant to disease, and ultimately, a significantly larger yield of delicious, homegrown tomatoes. This method isn’t just about planting; it’s about creating an optimal environment for your tomato plants to thrive. It’s about working *with* nature, not against it.
But don’t just take our word for it. We encourage you to experiment and adapt this method to suit your specific gardening conditions. Perhaps you want to try different types of organic fertilizers in the planting hole, such as bone meal for phosphorus or kelp meal for trace minerals. Maybe you’ll find that adding a handful of Epsom salts (magnesium sulfate) helps prevent magnesium deficiencies, especially in areas with alkaline soil. Consider the specific needs of your tomato variety – some heirlooms, for example, might benefit from a slightly richer soil amendment.
Variations to Consider:
* Companion Planting: Enhance your tomato patch by planting basil, marigolds, or other companion plants nearby. These can deter pests and attract beneficial insects, further boosting your tomato production.
* Vertical Gardening: If space is limited, adapt this method for container gardening or vertical growing systems. Just ensure your containers are large enough to accommodate the mature size of your tomato plants.
* No-Till Gardening: Integrate this planting technique into a no-till gardening system to minimize soil disturbance and promote a healthy soil ecosystem.
* Different Tomato Varieties: Experiment with different tomato varieties to see which ones respond best to this planting method in your specific climate and soil conditions. From juicy beefsteaks to sweet cherry tomatoes, the possibilities are endless.
We’re confident that once you try this DIY tomato planting method, you’ll be amazed by the results. It’s a small investment of time and effort that yields a significant return in terms of plant health, fruit production, and overall gardening satisfaction.
So, grab your gardening gloves, gather your supplies, and get ready to transform your tomato-growing experience. We can’t wait to hear about your successes! Share your photos, tips, and experiences with us in the comments below. Let’s build a community of thriving tomato gardeners! Remember, the best way to learn is by doing, and the best way to improve is by sharing our knowledge. Happy planting!
Frequently Asked Questions (FAQ)
What kind of fertilizer should I use in the planting hole?
The best fertilizer to use in the planting hole is an organic, slow-release fertilizer specifically formulated for tomatoes. Look for a fertilizer with a balanced NPK ratio (nitrogen, phosphorus, and potassium) or one that is slightly higher in phosphorus to promote root development. Options include composted manure, bone meal, rock phosphate, or a commercially available organic tomato fertilizer. Avoid using synthetic fertilizers directly in the planting hole, as they can burn the delicate roots of the young tomato plants. The goal is to provide a gentle, sustained release of nutrients as the plant grows.
How deep should I bury the tomato plant?
This is a crucial step! You should bury the tomato plant deep, up to the first set of leaves. Tomato plants have the unique ability to grow roots along their stems, so burying them deep encourages a more extensive and robust root system. This leads to stronger, healthier plants that are better able to absorb water and nutrients. Remove the lower leaves that will be buried to prevent them from rotting.
What if I don’t have compost? Can I use something else?
Absolutely! While compost is an excellent soil amendment, you can substitute it with other organic materials. Well-rotted manure, leaf mold, or even shredded newspaper can be used to improve soil structure and provide nutrients. Just make sure the material is fully decomposed to avoid nitrogen depletion in the soil. You can also purchase a commercially available soil amendment specifically designed for vegetable gardens.
How often should I water my tomato plants after planting?
Water deeply and regularly, especially during the first few weeks after planting. Aim to keep the soil consistently moist but not waterlogged. Water at the base of the plant to avoid wetting the foliage, which can increase the risk of fungal diseases. As the plants mature, you can reduce the frequency of watering, but increase the amount of water each time. A good rule of thumb is to water when the top inch of soil feels dry to the touch.
My tomato plants are getting blossom end rot. Will this method help?
Yes, this planting method can significantly reduce the risk of blossom end rot. Blossom end rot is caused by a calcium deficiency, which is often due to inconsistent watering or poor calcium uptake. By burying the tomato plant deep and providing a consistent supply of nutrients, including calcium, you can help prevent this problem. Adding crushed eggshells or bone meal to the planting hole can also provide an extra boost of calcium. Consistent watering is key to ensuring the plant can absorb the calcium from the soil.
Can I use this method for other plants besides tomatoes?
While this method is particularly beneficial for tomatoes, it can also be adapted for other plants in the nightshade family, such as peppers and eggplants. These plants also benefit from deep planting and a consistent supply of nutrients. You may need to adjust the type of fertilizer and soil amendments based on the specific needs of the plant.
What if I live in a cold climate? Can I still use this method?
Yes, you can still use this method in a cold climate, but you may need to take some extra precautions. Start your tomato plants indoors several weeks before the last expected frost. Harden them off gradually before transplanting them outdoors. Consider using row covers or other protective measures to shield the plants from cold temperatures and frost. Choose tomato varieties that are well-suited to your climate and have a shorter growing season.
How do I know if my tomato plants are getting enough nutrients?
The appearance of your tomato plants can provide clues about their nutrient status. Yellowing leaves can indicate a nitrogen deficiency, while stunted growth can be a sign of a phosphorus deficiency. Purplish leaves can indicate a potassium deficiency. If you suspect a nutrient deficiency, conduct a soil test to determine the specific nutrient levels in your soil. Amend the soil with appropriate fertilizers or soil amendments to correct any deficiencies.
What are some common pests and diseases that affect tomato plants, and how can I prevent them?
Common pests of tomato plants include aphids, tomato hornworms, and whiteflies. Diseases include early blight, late blight, and Septoria leaf spot. To prevent these problems, practice good garden hygiene, such as removing diseased leaves and weeds. Use organic pest control methods, such as insecticidal soap or neem oil, to control pests. Choose disease-resistant tomato varieties. Provide good air circulation around the plants to prevent fungal diseases.
How long does it take for tomato plants to produce fruit after planting?
The time it takes for tomato plants to produce fruit depends on the variety of tomato and the growing conditions. Generally, it takes about 60-85 days from transplanting to harvest. Cherry tomatoes tend to ripen sooner than larger beefsteak tomatoes. Provide your tomato plants with plenty of sunlight, water, and nutrients to encourage early and abundant fruit production.

Leave a Comment