
Towel Bean Sprouts Growing: Ever dreamt of having fresh, crunchy bean sprouts right at your fingertips, ready to add a burst of flavor to your salads, stir-fries, or sandwiches? Forget those expensive grocery store runs and embrace the magic of growing your own! This isn’t just about saving money; it’s about connecting with nature and enjoying the unparalleled taste of homegrown goodness.
Growing bean sprouts at home has a rich history, particularly in Asian cultures where they’ve been a staple ingredient for centuries. Think of the vibrant flavors of Vietnamese pho or the satisfying crunch in a Korean bibimbap – bean sprouts are often the unsung heroes! This simple technique has been passed down through generations, and now, I’m excited to share a super easy DIY method with you: growing bean sprouts using just a towel!
Why should you try this? Well, for starters, it’s incredibly simple and requires minimal space. Whether you live in a sprawling house or a cozy apartment, you can easily cultivate your own batch of fresh bean sprouts. Plus, it’s a fantastic way to reduce food waste and embrace a more sustainable lifestyle. Imagine the satisfaction of knowing exactly where your food comes from and that you nurtured it from seed to sprout. This towel bean sprouts growing method is perfect for beginners and seasoned gardeners alike. Let’s dive in and unlock the secrets to growing delicious, healthy bean sprouts right in your own kitchen!

Grow Bean Sprouts at Home with Just a Towel!
Hey there, fellow DIY enthusiasts! Are you looking for a super easy, super rewarding project that brings fresh, crunchy goodness right to your kitchen? Well, look no further! Today, I’m going to walk you through how to grow bean sprouts using nothing more than a towel, some beans, and a little bit of patience. Trust me, it’s simpler than you think, and the results are absolutely delicious. Plus, it’s a fantastic way to add a healthy boost to your meals without breaking the bank. Let’s get sprouting!
What You’ll Need
Before we dive in, let’s gather our supplies. The beauty of this method is that you probably already have everything you need!
* **Bean Seeds:** Mung beans are the classic choice for bean sprouts, and they’re readily available at most grocery stores or Asian markets. You can also experiment with other beans like adzuki beans, lentils, or even chickpeas, but mung beans are the easiest to start with. About 1/2 cup of beans is a good starting point.
* **Clean Towel:** A clean, lint-free cotton towel is essential. I prefer using a thin kitchen towel or a flour sack towel. Avoid using terry cloth towels, as they can be too thick and retain too much moisture, which can lead to mold.
* **Wide-Mouth Jar or Container:** A glass jar, a plastic container, or even a colander will work. The key is that it needs to be wide enough to spread the beans out and allow for good air circulation.
* **Water:** Clean, filtered water is best.
* **Rubber Band or String:** To secure the towel over the jar or container.
* **Dark Place:** A cupboard, a drawer, or even a covered pot will do the trick. Bean sprouts need darkness to grow properly.
* **Spray Bottle (Optional):** This can be helpful for keeping the towel moist.
Step-by-Step Instructions: From Bean to Sprout!
Alright, let’s get down to business! Here’s how to grow your own bean sprouts using the towel method:
1. **Soak the Beans:**
* Rinse your beans thoroughly under cool water to remove any debris or dust.
* Place the rinsed beans in a bowl and cover them with plenty of water. The beans will absorb water and expand, so make sure they have enough room.
* Let the beans soak for at least 8 hours, or preferably overnight. This step is crucial for softening the beans and kickstarting the germination process. I usually soak mine before I go to bed, so they’re ready to go in the morning.
2. **Prepare Your Sprouting Container:**
* Thoroughly wash and dry your jar or container.
* Dampen your clean towel with water. It should be moist but not soaking wet. Wring out any excess water.
* Line the inside of your jar or container with the damp towel. Make sure the towel covers the entire inside surface. This will provide a moist environment for the beans to sprout.
3. **Spread the Soaked Beans:**
* Drain the soaked beans and rinse them again under cool water.
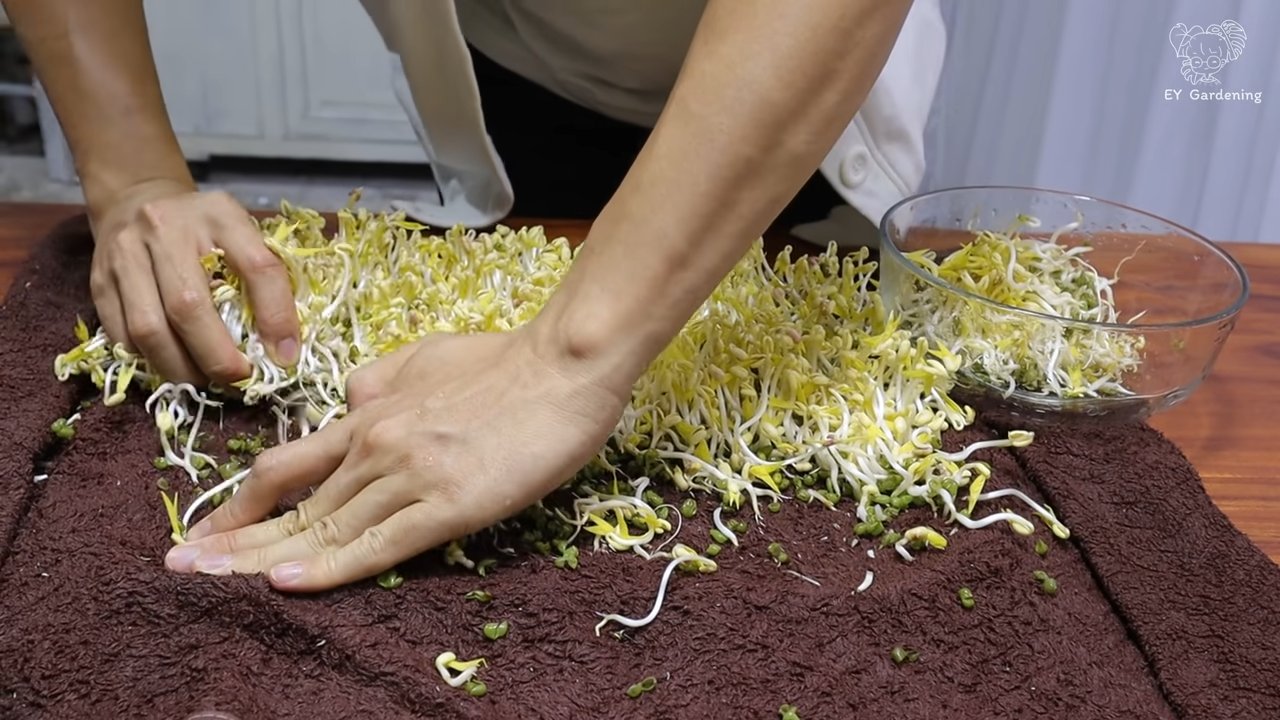
* Gently spread the beans evenly over the damp towel inside the jar or container. Avoid overcrowding the beans, as this can lead to mold growth. You want them to have enough space to breathe.
4. **Cover and Secure:**
* Cover the top of the jar or container with another piece of damp towel. This will help to maintain humidity and keep the beans in the dark.
* Secure the towel with a rubber band or string. This will prevent the towel from slipping off and exposing the beans to light.
5. **Find a Dark, Cool Place:**
* Place your jar or container in a dark, cool place. A cupboard or a drawer works perfectly. The ideal temperature for sprouting is between 65°F and 75°F (18°C and 24°C).
6. **Rinse and Repeat (The Most Important Step!):**
* This is the most crucial step for successful bean sprouting! You need to rinse the beans at least twice a day, preferably three times, to keep them moist and prevent mold growth.
* To rinse, carefully remove the towel covering the top of the jar or container.
* Gently pour cool water over the beans, making sure to rinse them thoroughly.
* Drain the water completely. You can use the towel to help drain the water by tilting the jar or container.
* Replace the damp towel covering the top of the jar or container and secure it with the rubber band or string.
* Return the jar or container to its dark, cool place.
7. **Observe and Be Patient:**
* After a day or two, you should start to see tiny sprouts emerging from the beans.
* Continue rinsing the beans twice or three times a day, and keep them in a dark, cool place.
* The sprouts will grow rapidly, and you’ll be amazed at how quickly they develop.
8. **Harvest Your Sprouts:**
* Your bean sprouts will be ready to harvest in about 3 to 5 days, depending on the temperature and humidity.
* They should be about 1 to 2 inches long and have a crisp, crunchy texture.
* To harvest, simply remove the sprouts from the jar or container.
* Rinse them thoroughly under cool water to remove any remaining bean hulls.
9. **Store Your Sprouts:**
* Store your harvested bean sprouts in an airtight container in the refrigerator.
* They will keep for about a week, but they’re best consumed as soon as possible for optimal freshness and flavor.
Troubleshooting Tips and Tricks
Even with the best instructions, sometimes things don’t go exactly as planned. Here are a few common issues and how to fix them:
* **Mold Growth:** If you notice any mold growing on your bean sprouts, it’s usually due to insufficient rinsing or overcrowding. Discard the affected sprouts immediately and start a new batch, making sure to rinse them more frequently and avoid overcrowding.
* **Slow Growth:** If your bean sprouts are growing slowly, it could be due to low temperature or insufficient moisture. Make sure they’re in a warm enough place and that you’re rinsing them frequently enough.
* **Dry Sprouts:** If your bean sprouts are drying out, it means they’re not getting enough moisture. Increase the frequency of rinsing and make sure the towel is always damp.
* **Bitter Taste:** Sometimes, bean sprouts can develop a slightly bitter taste. This is usually due to the bean hulls. Make sure to rinse the sprouts thoroughly after harvesting to remove any remaining hulls.
Creative Ways to Use Your Homegrown Bean Sprouts
Now that you’ve successfully grown your own bean sprouts, it’s time to enjoy them! Here are a few of my favorite ways to use them:
* **Salads:** Add a crunchy texture and fresh flavor to your salads.
* **Sandwiches and Wraps:** Use them as a healthy and delicious filling for sandwiches and wraps.
* **Stir-fries:** Toss them into your stir-fries for added crunch and nutrients.
* **Soups:** Garnish your soups with bean sprouts for a fresh and vibrant touch.
* **Spring Rolls:** A classic ingredient in fresh spring rolls.
* **As a Snack:** I sometimes just eat them raw as a quick and healthy snack!
Experiment and Have Fun!
Growing bean sprouts at home is a fun and rewarding experience. Don’t be afraid to experiment with different types of beans and different growing methods. The most important thing is to have fun and enjoy the process! I hope this guide has inspired you to try growing your own bean sprouts. Happy sprouting!
Conclusion
So, there you have it! Growing your own bean sprouts using the towel method is not just a fun experiment; it’s a gateway to fresher, healthier, and more flavorful meals. Forget those limp, often questionable sprouts from the grocery store. With minimal effort and readily available materials, you can cultivate a vibrant batch of crisp, delicious bean sprouts right in your own kitchen.
Why is this DIY trick a must-try? Because it puts you in control. You control the quality of the beans, the cleanliness of the environment, and ultimately, the taste and nutritional value of your sprouts. You’re bypassing potential pesticides, long storage times, and the environmental impact of commercially grown sprouts. Plus, let’s be honest, there’s something incredibly satisfying about nurturing life from a tiny seed to a crunchy, edible delight.
Beyond the basic method, there’s plenty of room for experimentation. Try different types of beans! Mung beans are the classic choice, but adzuki beans, lentils, or even chickpeas can be sprouted using the same technique. Each will offer a unique flavor and texture profile. You can also play around with the environment. Some people prefer a completely dark environment, while others find that a little indirect light enhances growth. Consider the temperature of your sprouting area as well. A slightly warmer environment can speed up the process, while a cooler one can slow it down, allowing you to control the harvest time.
Don’t be afraid to get creative with your sprouts! Add them to salads for a satisfying crunch, toss them into stir-fries for a burst of freshness, or use them as a topping for soups and sandwiches. They’re a versatile ingredient that can elevate almost any dish.
We wholeheartedly encourage you to give this towel bean sprouts growing method a try. It’s simple, cost-effective, and incredibly rewarding. Once you taste the difference between homegrown and store-bought sprouts, you’ll never go back.
And most importantly, we want to hear about your experience! Did you try a different type of bean? Did you discover a secret to faster sprouting? Share your tips, tricks, and photos in the comments below. Let’s build a community of sprout enthusiasts and unlock the full potential of this amazing DIY project. Your insights could help others discover the joy of growing their own fresh, healthy, and delicious bean sprouts. Happy sprouting!
Frequently Asked Questions (FAQ)
What types of beans work best for the towel method?
Mung beans are the most commonly used and generally considered the easiest to sprout using the towel method. However, you can also successfully sprout adzuki beans, lentils, chickpeas, and even some types of peas. Keep in mind that different beans may have slightly different sprouting times and require adjustments to the moisture levels. Experiment to find your favorites! Just be sure to use beans specifically intended for sprouting or cooking, not treated seeds meant for planting in the garden.
How long does it take for bean sprouts to grow using this method?
Typically, bean sprouts grown using the towel method will be ready to harvest in 3 to 5 days. The exact time will depend on the type of bean, the temperature of your sprouting environment, and the amount of moisture. Check your sprouts daily and harvest them when they reach your desired length and crispness.
How do I keep the towels moist without overwatering the beans?
The key is to keep the towels consistently damp, not soaking wet. You should be able to gently squeeze the towel and only get a few drops of water. If the towels are dripping, they’re too wet, which can lead to mold growth. Mist the towels with a spray bottle once or twice a day, or as needed, to maintain the proper moisture level.
What if I see mold growing on my bean sprouts?
Mold growth is a sign that the environment is too wet or that the beans were not properly cleaned before sprouting. If you see mold, discard the entire batch of sprouts and start over. To prevent mold, ensure proper drainage, use clean towels and containers, and rinse the beans thoroughly before and during the sprouting process. Also, avoid overcrowding the beans, as this can restrict airflow and increase the risk of mold.
Do I need to keep the bean sprouts in the dark?
While bean sprouts can be grown in the dark, a little indirect light can actually be beneficial. Darkness encourages the sprouts to grow longer and thinner, while some indirect light can help them develop a slightly greener color and a more robust flavor. Avoid direct sunlight, as this can overheat the sprouts and dry them out.
How do I store bean sprouts after harvesting?
Once harvested, bean sprouts should be stored in the refrigerator in an airtight container. They will typically last for 3 to 5 days. To help them stay fresh, you can line the container with a paper towel to absorb excess moisture. Rinse the sprouts before using them.
Can I eat the bean sprout roots?
Yes, the roots of bean sprouts are perfectly edible. They are a natural part of the sprout and contain nutrients. Some people prefer to trim the roots for aesthetic reasons, but it’s not necessary.
What are the nutritional benefits of eating bean sprouts?
Bean sprouts are a good source of vitamins, minerals, and fiber. They are low in calories and fat, making them a healthy addition to your diet. They contain vitamins C and K, as well as folate, manganese, and potassium. The sprouting process also increases the bioavailability of certain nutrients, making them easier for your body to absorb.
Can children and pregnant women eat bean sprouts?
While bean sprouts are generally safe to eat, it’s important to take precautions to minimize the risk of foodborne illness, especially for children, pregnant women, and individuals with weakened immune systems. Thoroughly wash the sprouts before eating them, and consider cooking them to kill any potential bacteria. If you have any concerns, consult with your doctor or a registered dietitian.
What if my bean sprouts don’t sprout at all?
If your bean sprouts don’t sprout, there could be several reasons. The beans may be old or damaged, the temperature may be too cold, or the towels may not be moist enough. Make sure to use fresh, high-quality beans, maintain a consistent temperature, and keep the towels consistently damp. If you’ve tried these things and your sprouts still aren’t growing, try a different batch of beans or a different sprouting method.

Leave a Comment